|
|
CHAPTER 2 Battle CommandBattle command is the art of decision-making and leading on the battlefield. It covers the knowledge, techniques, and procedures necessary to control operations and to motivate soldiers and their organizations into action to accomplish assigned missions. As part of battle command, commanders visualize the current state of the battlefield as well as future states at different points in the operation; they then formulate concepts of operations that allow their units to progress from one state to the other at the least cost. Other elements of the battle command process include assigning missions, prioritizing and allocating resources, selecting the critical times and places to act, and knowing how and when to make adjustments during the fight. The company team commander employs a variety of means to prepare for operations, issue orders, employ the company team, and communicate. The success of this command and control process rests mainly on effective training; thorough (and thoroughly understood) SOPs; accurate, timely communications; and, most of all, decisive leadership. |
|||
SECTION 1 - COMMAND |
Command is the authority that a commander in military service lawfully exercises over subordinates by virtue of rank and assignment. It is vested in an individual who possesses total responsibility and accountability for the actions of his unit. It is the authority that empowers this individual, the commander, to effectively use available resources in planning assigned missions and in organizing, coordinating, employing, and directing the necessary military forces to accomplish these missions at the least possible expense in manpower and material. Command, however, is more than the simple exercise of constitutional, legal authority; it goes beyond merely the practiced application of a set of managerial skills. The essence of command authority is the sum of many intangible personal assets: the commander’s knowledge, experience, and personality and how he interacts with his own unit and with others. Above all, command is an art. It is the art of effective decision-making and of motivating and leading both individual soldiers and larger organizations. It is the art of turning decisions, motivation, and leadership into actions that impose the will of the commander on his unit and, ultimately, the will of the nation on its enemies. |
This method of directing military operations encourages and assists subordinates in taking action consistent with the intent and concept of higher headquarters. Mission-oriented command and control requires a clear understanding by subordinate elements of the unit purpose; at the same time, it provides them with the freedom to react to enemy actions without further guidance. The following paragraphs outline the underlying principles of this type of command and control. |
||
Expect |
The commander must understand the environment of combat. The battle will be dynamic and the enemy uncooperative. Communications may be degraded, and the chaos of battle may prevent the commander from knowing what is happening beyond the reach of his own senses. The situation the unit anticipates during the planning phase will inevitably change before and during execution. |
|
Reduce leader |
When soldiers expect the commander to make every decision or initiate every action, they may become reluctant to act. To counter this tendency, the commander must plan and direct operations in a manner that requires a minimum of intervention. He operates on the principle that some loss of precision is better than inactivity. |
|
The commander still must be prepared to provide subordinates with the criteria and guidance for making decisions when precise control is required for synchronization. During the planning process, he should identify those few critical decisions that will absolutely be required during the battle and then determine the criteria for initiation of actions associated with these decisions. Examples include the use of engagement criteria, trigger lines, and disengagement criteria. The commander then disseminates the decision criteria throughout the company team. NOTE: The commander must keep in mind that changing conditions and unexpected situations will require him to make decisions continuously once the battle begins. His preparations related to critical decisions will allow him, and his subordinates, to react more effectively when changes become necessary. |
||
Optimize |
The company team commander must ensure that the timelines he develops for mission planning and preparation provide adequate troop-leading time for the subordinate elements. An effective way to optimize the use of the available time, no matter how short, is to conduct training of the company team orders process under tough, realistic conditions at every available opportunity. |
|
Allow maximum |
Given the expected battlefield conditions, leaders at every level must avoid placing unnecessary limits on their soldiers’ freedom of action. The leader at the point of decision must have the knowledge, training, and freedom necessary to make the correct choice in support of the commander’s intent. This concept must be emphasized at every opportunity at every level of leadership. Soldiers win battles; their leaders can only place them in a position where they are able to seize the opportunity to do so. Subordinates will be successful on the battlefield only if their commanders and leaders have fostered the necessary confidence and initiative before the battle begins. |
|
Encourage cross-talk |
Subordinate leaders do not always require guidance from the commander to address a change in the situation. In some instances, because of their position on the battlefield, two or more subordinates, working together, may have the clearest view of what is happening and may be better suited than the commander to develop a tactical solution. This type of problem-solving, involving direct coordination between subordinate elements, is critical to mission-oriented command and control. In addition to its obvious impact on mission accomplishment, it empowers subordinates to take decisive action and teaches them the value of close cooperation in achieving the unit’s overall purpose. |
|
Command and |
The commander positions himself where he can best fight his company team and make critical decisions to influence the outcome of the fight. This position is normally with the main effort to allow the commander to exert his leadership and to shift or retask the main effort as necessary. He must be far enough forward to "see" the battlefield using all available resources; these assets include not only visual observation but also radio reports and, in digitized units, information provided over digital systems. The team XO is normally with the supporting effort and must be able to rapidly assume command if needed. |
|
Plans are the basis for any mission. The company team commander develops his concept of the operation summarizing how best to accomplish his mission within the scope of the task force and brigade commanders’ intents. The team commander uses troop-leading procedures to turn the concept into a fully developed plan and to prepare a concise, accurate OPORD. He assigns additional tasks (and outlines their purpose) for subordinate elements, allocates available resources, and establishes priorities to make the concept work. The following discussion, covering important aspects of orders development, serves as an introduction to the discussion of troop-leading procedures and delegation skills later in this chapter. The first portion focuses on the mission statement and the commander’s intent, which provide the doctrinal foundation for the OPORD. Also included are basic discussions of the three types of orders (warning orders, OPORDs, and FRAGOs) used by the team commander. It is important for the company team commander to have a thorough understanding of these elements because they are the building blocks for everything else that he does during the troop-leading process. (NOTE: Refer to Appendix A of this manual for more detailed information on orders formats.) |
|||
Mission statement |
The commander uses the mission statement to summarize the upcoming operation. This brief paragraph (sometimes a single sentence) describes the form of operation, the unit’s task and purpose, the actions to be taken, and the reasons for these actions. It is written in a format based on the five "Ws": who (unit), what (tasks/operations), when (date-time group), where (grid location/geographical reference for the area of operations and/or objective), and why (purpose). The commander must ensure that the mission is thoroughly understood by all leaders and soldiers two echelons below (section or squad). The following paragraphs cover considerations that apply in development of the mission statement. |
||
Operations |
Operations are groupings of related activities in four broad categories: offense, defense, stability, and support. Each category is subdivided into types of operations, with different types further divided into forms of operations. |
||
Table 2-1. Operations.
|
Category |
OFFENSE |
DEFENSE |
STABILITY |
SUPPORT |
| Types of operations (Forms of operations are listed under types) |
Movement to contact Attack - Counterattack - Raid - Feint - Demonstration - Search and attack Pursuit |
Area defense Mobile defense Retrograde - Withdrawal - Retirement |
Peace operations Counterdrug operations Nation assistance Support to insurgencies Show of force Combating terrorism NEOs Support to civil authorities Support to counterinsurgencies Support to civil disturbance |
Humanitarian operations Environmental operations |
The company team may also take part in a variety of other operations; these may be conducted as part of any operation in the four general categories outlined above. The following are examples of these additional operations:
|
||||||||||||||||||
Tasks |
Tactical tasks are specific activities performed by the unit while it is conducting a form of tactical operation or a choice of maneuver. (NOTE: The title of each task can also be used as an action verb in the unit’s mission statement to describe actions during the operation.) Normally, a commander will assign one mission-essential task to each subordinate unit. Tasks should be definable, attainable, and measurable. Tactical tasks that require specific TTP for the company team are covered in detail throughout this manual. The following list gives examples of tactical tasks the team and its subordinate elements may be called upon to conduct:
NOTE: For clarity, the commander normally lists tasks and operations together in the OPORD mission statement. |
||||||||||||||||||||||||||||||||||
Purpose |
A simple, clearly stated purpose improves understanding of the commander’s intent. It will also assist subordinate leaders in adjusting their tasks during execution of the mission, allowing them to stay within the parameters of the higher commander’s intent. The purpose should tell the subordinates why the company team is conducting the mission and how the team will operate with or provide support for other units. The following list provides examples of purposes that the company team may be called upon to achieve:
|
||||||||||||||
Placement |
The commander has several options as to where in the OPORD he outlines his subordinates’ mission-essential tasks and purpose. His overriding consideration is that placement of the mission statement should assist subordinate leaders in understanding exactly each of the five "W" elements. |
||
| Example mission statement |
The following is an example of a mission statement the company team commander might include in his order: Team D (who) attacks at 040600Z FEB 97 (when) to breach (what) the obstacle belt at NX330159 (where), enabling Team B (task force main effort) to penetrate the enemy’s positions vicinity OBJ BOB (why). |
||
Commander's |
The commander’s intent is a clear, concise statement of what the company team must do to succeed in relation to the enemy, the terrain, and the desired end state. It provides the link between the mission statement and the concept of the operation by stating the key tasks that, along with the mission, are the basis for subordinates to exercise initiative when unanticipated opportunities arise or when the original concept of the operation no longer applies. The commander can also use the intent statement to explain a broader purpose for the operation beyond that outlined in the mission statement. The intent, which is mandatory in all orders, may be expressed in several "bullets" or in complete sentences; these presentation methods are covered later in this discussion. As with the mission, the commander must ensure that the intent statement is thoroughly understood by all leaders and soldiers two echelons below (section or squad). The following paragraphs focus on considerations that apply in development and presentation of the intent statement. |
||
| How to use the intent statement |
The purpose of the intent at the company team level is to provide vehicle commanders and squad leaders with a summary of the most important details of what the company team is supposed to achieve during the operation. The intent statement must be developed and presented so they can remember this critical information, recognize specific situations while in contact on the battlefield, and act in accordance with the commander’s intent to achieve the desired end state. The focus of the intent is on the company team’s key tasks during the operation. Key tasks are those that the team must perform to achieve the stated purpose of the operation, as outlined in paragraph 2 of the OPORD; they may also specify conditions that must be met for mission accomplishment. Key tasks are not tied to a specific COA; rather, they identify actions or conditions that are fundamental to the unit’s success. In the ever-changing operational environment, such as when significant opportunities present themselves or when the original concept or COA does not apply, subordinate elements use these tasks to ensure their efforts continue to support the commander’s intent. Examples of critical areas that key tasks may cover include the tempo of the operation, the desired effect of fires on the enemy, and terrain that must be controlled. At the same time, the intent statement does not specify the technique or method by which the unit will achieve the commander’s projected end state; the method is covered in the concept of the operation. Nor does the intent cover "acceptable risk"; risk factors are part of the commander’s guidance and are addressed in the evaluation of all COAs for the operation. In addition, the purpose addressed in the intent is not merely a restatement of the why (purpose) from the mission statement, which focuses on the company team’s immediate operation. Instead, the commander uses the intent to examine the broader operational context of the company team and higher missions. |
||
| "Bullet" method of presentation |
One technique in presentation of the commander’s intent is to condense it to three to five "bullet" comments (instead of reciting a lengthy paragraph). This can make it easier for the team’s subordinate leaders to recall each point and recognize related situations. As an example, the following could summarize the commander’s intent for a mechanized infantry team with the task of seizing a choke point for the purpose of allowing the remainder of the task force to pass: My intent is to accomplish these actions during the operation:
|
||
| Paragraph method of presentation |
The company team commander can also summarize his intent in paragraph form. He should keep the intent statement as concise as possible; at the same time, however, he must ensure that the paragraph covers all pertinent details of the operation. The following example shows how he might explain the team’s mission to provide support by fire as the support force in a task force deliberate attack: We must suppress all enemy forces that can place effective direct fires against Team Bravo as it assaults. We will maintain this suppression until Team Bravo begins its maneuver. Additionally, we must be prepared to assume Team Bravo’s assault to seize the choke point. NOTE: The examples provided here should not be interpreted as the only "correct" methods of presenting the intent statement. The company team commander must determine the most effective way to summarize his intent based on such factors as the complexity of the mission, the applicable METT-TC factors, and the conditions under which the order is being issued. |
||
Combat orders |
Combat orders are the means by which the company team commander receives and transmits information, from the earliest notification that an operation will occur through the final phases of execution. These basic tools are absolutely critical to mission success. In a tactical situation, the team commander and subordinate leaders work with combat orders on a daily basis; obviously, they must have precise knowledge of the correct format for each type. At the same time, they must ensure that every soldier in the company team understands how to receive and respond to the various types of orders. Because of these requirements, the commander must take every opportunity to train the team in the use of combat orders. The skills associated with orders development and dissemination are highly perishable; they can be lost without constant, realistic practice. (NOTE: Refer to Appendix A of this manual for examples of company team orders formats.) |
||
Warning order |
During the planning phase of an operation, commanders use warning orders as a shorthand method of alerting their subordinate leaders. Warning orders also initiate the commander’s most valuable time management tool, the parallel planning process. The company team commander usually sends a series of warning orders to his subordinate leaders to help them prepare for new missions. The directions and guidelines in the warning order allow subordinates to begin their own planning and preparation activities.
The content of warning orders is based on two major variables: information about the upcoming operation that is available to the company team from the task force and what the team commander ultimately wants to achieve by issuing the warning order (what he wants his subordinates to do with the information). The commander normally issues his warning orders either as he receives additional orders from the task force or as he completes his own analysis of the situation. In addition to alerting the unit to the upcoming operation, warning orders allow the commander to put out tactical information incrementally and, ultimately, to shorten the length of the actual OPORD. In the example in Table 2-2, the commander uses three warning orders to issue information that otherwise would make up paragraphs 1 and 2 and most of paragraph 3 in the OPORD. As a result, when he issues the OPORD, he can simply review previously issued information or brief the changes or earlier omissions. He will then have more time to concentrate on visualizing his concept of the fight for his subordinates. Table 2-2 summarizes an example of how the company team commander might use a series of warning orders both to alert the team to an upcoming operation and to provide tactical information and initial planning guidance. The left-hand column lists actions the commander takes before issuing each of the three warning orders in the example. The center column describes specific elements included in each warning order, with the right-hand column outlining the commander’s purpose for each order. NOTE: The numbering system used in Table 2-2 (warning orders #1, #2, and #3) recurs in the discussion of troop-leading procedures to explain how warning orders are used at various phases of the troop-leading process. |
||
Operation order |
When time and information are available, the company commander will normally issue a complete OPORD as part of his troop-leading procedures. As noted, he does not need to repeat information covered previously in his warning orders. The commander may also issue an execution matrix, either to supplement the OPORD or as a tool to aid in the execution of the mission; however, the matrix order does not replace a five-paragraph OPORD. Techniques for presentation of the OPORD and visualization of the operation are covered in detail in the discussion of step 7 of troop-leading procedures (issue the order). Refer to Appendix A for more detailed information on the five-paragraph OPORD format and for an example matrix order. |
||
Table 2-2. Example of a commander’s use of multiple warning orders.
|
|||||||||||||||
Fragmentary order |
The FRAGO is a brief oral or written order that can serve any of the following purposes:
A written FRAGO follows the five-paragraph OPORD structure; however, it includes only the information required for subordinates to accomplish their mission. To enhance understanding of voice FRAGOs, digitally equipped units can quickly develop hasty graphics and transmit digital overlays. During the execution of an operation, FRAGOs are the medium of battle command. The company team commander uses them to communicate changes in the enemy or friendly situation and to retask his subordinate elements based on changes in the situation. The company team FRAGO normally includes the following information:
Table 2-3 illustrates the various transmissions that might be sent as part of an oral company team FRAGO.
Table 2-3. Example company team FRAGO.
|
||||||||||||||||||||||
|
|
Figure 2-1. Troop-leading procedures and related activities.
Troop-leading procedures are the basis of the dynamic process (illustrated in Figure 2-1) by which units develop plans and orders at every level of leadership. The process, although discussed here with the eight steps in traditional order, is not rigid, and the steps are not necessarily sequential. The tasks involved in some steps (such as initiate movement, issue the warning order, and conduct reconnaissance) may recur several times during the process. Although listed as the last step, activities associated with supervising and refining the plan and other preparations occur throughout troop-leading. Conversely, in some situations, time constraints and other factors may prevent leaders from conducting steps as thoroughly as they would like. Regardless of the time available, leaders must always remember this principle: "See the terrain, see the enemy, see yourself." Only after they view and evaluate the terrain and the enemy can they determine what their own actions should be in that given situation. They update this visualization continuously throughout the troop-leading process, basing this new "picture" of the battlefield on their own refinements to the plan, additional information from the task force and other sources, or developments in the reconnaissance and security fight. Troop-leading procedures begin when the leader receives the first indication of an upcoming operation (often a warning order from higher headquarters) and continue throughout the planning, preparation, and execution phases of the mission. Starting as the first bit of information becomes available allows the leader to maximize the available planning time. The warning order is the most important time-management tool the commander has and is also his most effective means of delegating responsibility. In addition, by immediately passing information to subordinate leaders through the use of warning orders, he can ensure that they develop their plans concurrently with his. Under no circumstances should leaders delay the start of the troop-leading process, even if initial information is incomplete or vague. NOTE: In many cases, the commander can initially make most effective use of his troop-leading time by conducting physical actions on the ground, such as developing an engagement area, preparing BPs, or conducting other preparations. He then can move on to the other troop-leading steps. The following discussion provides a step-by-step overview of troop-leading procedures. Figure 2-1 illustrates the process, along with some of the considerations and procedures involved in the eight steps. |
|||
Step 1 - |
This step normally begins with the receipt of an initial warning order from the task force, although it may begin when the company team commander receives the task force OPORD (if the task force did not use warning orders). If he receives the task force OPORD, he will normally be required to give a confirmation brief to the task force commander to ensure that he understands the higher commander’s concept of the operation and his intent for the company team. The team commander must also, as necessary, obtain clarification of the information from the higher headquarters and conduct initial coordination with other units. |
||
| Collect initial information |
Although mission analysis is continuously refined throughout the troop- leading process, the company team commander’s initial analysis is normally based only on the initial task force warning order. During this step, the commander conducts his initial METT-TC analysis, collecting information about the terrain and the friendly and enemy situations. Additionally, he conducts his initial time analysis, develops his initial security plan, and issues an initial warning order to provide guidance and planning focus for his subordinates. (NOTE: The initial analysis is normally conducted as quickly as possible to allow the commander to issue the initial warning order in a timely manner. He then conducts a more detailed METT-TC analysis after the initial warning order is put out.) |
||
| Issue the initial warning order (warning order #1) |
The step begins with the commander and his subordinate leaders gathering information about enemy and friendly forces, terrain, and weather as they prepare to receive the task force plan. They should focus on available information of all types: details provided in the task force warning order; terrain and weather data; their knowledge of the enemy’s doctrine. As the task force develops its plans, the company team commander remains proactive, calling the TOC or sending a runner to obtain information, such as updated SITEMPs and graphics, as it becomes available. With each piece of information, he and his leaders continue to build and refine the company team plan. (NOTE: In many instances, the tactical situation will still be vague because the reconnaissance and security plan has not been executed, because the task force or brigade has not received its orders, or because the unit has just arrived in the area of operations.) Upon receipt of the initial task force warning order, the commander immediately passes on the information to the company team’s subordinate leaders. At a minimum, the initial team warning order should include the following:
|
||
Analyze the mission |
The commander conducts mission analysis using the factors of METT-TC: mission, enemy, terrain (and weather), troops, time available, and civilian considerations. Mission analysis is a continuous process. The commander constantly receives information (during the planning phase, en route to the objective, or just prior to assaulting an enemy force) and must decide if the information affects his mission. If it does, he then decides how to adjust his plan to meet this new situation. METT-TC is not necessarily analyzed sequentially. How and when the commander analyzes each factor depends on when information is made available to him. The following discussion covers the six factors of METT-TC in detail. NOTE: The acronym METT-TC is a common mnemonic device for the factors of mission analysis; the following discussion presents these elements in the traditional order (mission, enemy, terrain, troops, time available, and civilian considerations). Mission is always the first factor to be analyzed. The second factor in the analysis, however, should be terrain rather than the enemy. By analyzing the terrain first, the leader gains a clear picture of factors that influence the enemy situation; this enables him to develop a better understanding of the enemy’s capabilities and limitations. Mission analysis. After receiving an essential task and purpose, either in a warning order or the OPORD, the commander can begin the analysis of his own mission. He may use a refined product, such the modified combined obstacle overlay (MCOO) and/or the SITEMP (if available), to better visualize the interrelationships of the terrain, the enemy, and friendly forces. His goal in this analysis is to clarify what the unit is to accomplish, why the unit is to accomplish it, and what COAs it will take to achieve its overall purpose. Analysis of higher unit mission and intent. Leaders at every echelon must have a clear understanding of the intent and concept of operation of the commander two levels higher. For additional details on intent and concept, refer to the discussion of mission statements and commander’s intent earlier in this chapter. Analysis of own mission. Once he understands the operation at the task force and brigade levels, the commander can analyze the company team mission. Key considerations in this analysis include the following:
NOTE: There are two types of limitations: constraints and restrictions. Constraints dictate actions that the unit must take (such as retain one platoon in reserve). Restrictions specify actions or areas from which the unit is prohibited (such as no direct fires beyond PHASE LINE DOG). Restated mission. The commander writes his restated mission, ensuring that it includes the five "W" elements: who, what, when, where, and why. If the unit must accomplish more than one essential task, he lists them as on-order missions in the order in which they will occur. For an in-depth discussion of the mission statement and its components, refer to the discussion earlier in this chapter. Enemy analysis. The following paragraphs examine areas the commander should cover in his analysis of the enemy. Doctrinal analysis. This step normally begins with a study of the enemy’s tactical doctrine, his weapons and equipment, and his supporting battlefield functional systems. The result of this evaluation is a doctrinal template illustrating how the enemy force might look and act without the effects of weather and terrain. Early in the planning process, the commander reviews the enemy’s doctrine. He looks at specific enemy actions during a given operation (such as defense out of contact, security zone defense, or movement to contact). It is not enough simply to know the number and types of vehicles the enemy has. The commander and his subordinate leaders must thoroughly understand when, where, and how the enemy will use all assets down to squad level. The commander will normally not have time to develop a doctrinal template during troop-leading procedures, and he may not have a task force product until he receives the SITEMP. In such situations, predeveloped templates can provide a baseline for planning at company team and platoon levels. Figure 2-2 illustrates an example of a doctrinal template for an MRC strongpoint. One technique is to develop 1:50,000-scale threat doctrinal templates on acetate for use as an "off-the-shelf" doctrinal resource. The commander may develop necessary doctrinal templates for each major operation he expects the enemy to conduct. Composition (order of battle). Determine the number and types of threat vehicles and equipment in the company team area of operations. Analyze how the enemy organizes for combat, reviewing such areas as doctrinal formations and distances between units. Where does the enemy place his tanks and PCs within a formation or within a defense? Where and how many dismounted infantrymen and hand-held antitank systems does the enemy have, and how will he employ them? What CS and CSS assets does he have, where are they located, and how will he use them? How, when, and where does he use his reserve? Capabilities. Study the planning ranges for each threat weapon system. Assess the impact of doctrinal march rates and timelines. (NOTE: One technique is to have these capabilities listed in the leader’s books of the company team’s key subordinate elements.) Doctrinal objectives. Based on the expected threat mission, identify the enemy’s projected doctrinal objectives. In doctrinal terms, why will he conduct this type of operation? Is the enemy oriented on the terrain (for example, a forward detachment), on his own force (such as an advance guard), or on friendly forces (as in a security zone)? What effect will this have on the way the enemy fights? Anticipated enemy COAs. To identify potential enemy COAs, the commander weighs the results of his initial analysis of terrain and weather against the enemy’s composition, capabilities, and doctrinal objectives. The end product is a SITEMP that depicts graphically how he believes the enemy will fight under the specific conditions expected on the battlefield. The task force S2 should have developed his own SITEMP at this point in the troop-leading process. The company team commander should obtain a copy to assist him in developing the threat COAs; he should not develop the company team SITEMP independently of the S2’s product. If there are differences between the company team and task force products, he must resolve them before continuing with his analysis of the enemy. The commander must apply his own analysis of the specific force the team will face to the existing task force product. As an example, the S2’s SITEMP might identify the location of MRPs on the objective area and provide generic weapons range lines. The commander would apply his knowledge of the enemy and terrain to identify individual vehicle positions and, based on intervisibility lines around the objective area, to determine when and where enemy vehicles can engage the company team. |
||
|
|
Figure 2-2. Doctrinal template for a motorized rifle company strongpoint.
Factors influencing COAs. The following paragraphs examine key factors the commander should consider in refining (or developing) an accurate SITEMP for the enemy’s likely COAs. Mission. Based on threat doctrine and knowledge of the situation, determine what the enemy’s likely mission will be. Why is the enemy conducting this operation? Identify his likely task or objective. Is he trying to protect another threat unit, deceive friendly forces, allow another unit to bypass them, or prevent them from seizing terrain? Is the operation oriented on the terrain, on the enemy force, or on friendly forces? Specifically, what key terrain, enemy force, or friendly element is involved? How will this affect how the enemy attacks or defends? Objectives. Based on the SITEMP and the projected threat mission, identify the enemy’s march objectives (offense) or the terrain or force he intends to protect (defense). Avenues of approach. Reanalyze the avenues of approach. If the enemy is attacking, which avenues will he use to reach his objectives in executing his likely COAs? How will terrain affect his speed and formations? How will he use the key terrain and locations with clear observation and fields of fire during the fight? Which avenues should friendly forces deny him or divert him from? If the enemy is in the defense, which avenues provide the most direct or fastest access to the terrain the enemy is defending or to the enemy force itself? How will that affect positioning of the enemy forces? From the enemy perspective, what is the most dangerous approach for friendly units (this is where he may weight his effort)? Known enemy locations. Plot all known enemy positions in the task force area of operations (if not already provided on the S2’s SITEMP). Assumed enemy locations. In planning an attack on an objective, identify all threat platoons, down to the vehicle level, in the company team area of interest; plot their locations on applicable templates. Using the S2’s SITEMP as a framework, consider the situation from the enemy commander’s perspective. Given his mission, where will he place vehicles in his position? How will he employ them? If it becomes necessary, where will he reposition his forces? Use the MCOO to assist in identifying such features as observation, fields of fires, and maneuver space. One technique is to draw a line representing the maximum engagement range for each enemy weapon system in the team’s area of interest based on the fields of fire. In planning a defensive operation, consider where the threat commander will deploy, where he will position overwatch elements, and where he will move in the engagement area to avoid friendly direct fires. Based on weapons ranges and intervisibility factors, determine when the enemy can place effective fires on the company team defensive position. Boundaries, CPs, and reserves. Identify likely boundaries, seams, or time separations between platoon-, company-, and battalion-size elements. Determine the location of the enemy’s CPs and other command and control assets. Calculate the time required for reserves or reinforcing elements to influence the battle based on their initial positions. Engineer obstacles and fortifications. Plot the likely locations of obstacles and fortifications based on the enemy’s weapons ranges, fields of fires, and engineering capabilities. Enemy sketch. One way the commander can help subordinates understand the SITEMP is to develop a large sketch of enemy positions on the terrain. He can also use the sketch to illustrate the situation when he issues the company team OPORD later in the troop-leading process. Figure 2-3 is an example of a company team SITEMP with an enemy MRB conducting a defense out of contact. |
|||
|
|
Figure 2-3. Company team SITEMP for an MRB defense out of contact.
Terrain and weather analysis. In this step of mission analysis, the commander focuses not only on the impact of terrain and weather on the company team and other friendly forces, but also on how they will affect enemy operations. Terrain analysis. Normally, the task force staff will provide the company team with a MCOO, which depicts the physical effects of the battlefield on military operations. Ideally, the MCOO is developed early in the troop-leading process to allow leaders at all levels to take advantage of the information. In developing this product, the task force staff applies the five military aspects of terrain, known as OCOKA. These factors, summarized later in this discussion, are the following:
NOTE: The acronym OCOKA is a common mnemonic device for the military aspects of terrain. The following discussion presents these factors in the traditional order as listed in the previous paragraph; however, leaders should evaluate them in the order that best supports their terrain analysis. Because the MCOO is focused at the task force level, the company team commander must further refine it using considerations that are applicable at his level. As noted, key terrain for the task force may not be as critical to the company team and vice versa. For example, an intervisibility line near an objective area may be key terrain for an assault force within the company team, but may not be considered as key by other companies in the task force operation. In the absence of a task force MCOO, the company team commander can develop his own product. The commander normally must prioritize his analysis of the terrain based on time constraints that influence orders development at the company team level. For example, in the conduct of an assault, his priority may be the area around the objective, followed by analysis of the team’s specific axis leading to the objective. Time permitting, he might then analyze the rest of the task force area of operations. The following discussion examines OCOKA in detail. Observation and fields of fire. The commander must determine what locations along each avenue of approach provide clear observation and fields of fire for both the attacker and the defender. He analyzes the area surrounding key terrain, objectives, and obstacles. He locates intervisibility lines (terrain that allows observation from one point to another) and assesses the ability of the attacking force to overwatch or support (with direct fire) the movement of its elements. In analyzing fields of fire, the commander focuses on the ability of friendly and enemy units to cover terrain with direct fires from known or likely positions. In addition, he must identify positions that afford clear observation for FIST personnel, allowing them to employ indirect fires effectively. Whenever possible, the commander conducts a reconnaissance from the enemy and friendly perspectives. This will help him to determine where both friendly and enemy fires can be concentrated. (NOTE: Refer to the discussions of actions on contact in Chapter 3 and of engagement area development in Chapter 4.) Figure 2-4 lists several offensive and defensive considerations that the commander can include in his analysis of observation and fields of fire. |
|||
Figure 2-4. Considerations in analysis of observation Cover and concealment. The commander looks at the terrain, foliage, structures, and other features on the avenues of approach to identify sites that offer cover and concealment. In the defense, weapon positions must be both lethal and survivable, with effective cover and concealment just as vital as clear fields of fire. Figure 2-5 lists offensive and defensive considerations that the commander can include in his analysis of available cover and concealment.
Figure 2-5. Considerations in analysis of cover and concealment. Obstacles. In analyzing the terrain, the commander first identifies existing and reinforcing obstacles that may limit mobility (affecting such features as objectives, avenues of approach, and mobility corridors) and affect the company team’s countermobility effort. Existing obstacles include, but are not limited to, the following:
Reinforcing obstacles include, but are not limited to, the following:
Based on the degree of obstruction posed by obstacles, terrain is further classified in one of the following categories:
Friendly and enemy elements will usually take advantage of unrestricted terrain in situations requiring rapid movement. In other instances, such as when security is the paramount concern, they may move in more restricted terrain, which may provide more cover and concealment. Figure 2-6 lists several offensive and defensive considerations the commander can include in his analysis of obstacles and restricted terrain. |
|||||||||||
Figure 2-6. Considerations in obstacle analysis Key terrain. Key terrain is any location or area whose seizure, retention, or control affords a marked advantage to either combatant. As an example, a prominent hilltop overlooking an avenue of approach may or may not be key terrain. Even if the hill offers clear observation and fields of fire, it will be of no marked advantage to the unit that controls it if the opposition can easily bypass it on another avenue of approach. On the other hand, if the hilltop can influence the area through which a force must pass regardless of which avenue of approach it uses, the unit that controls the higher terrain has a definite advantage. Designation of an area as key terrain depends largely on the characteristics of the avenue of approach (such as the width or length and the restrictiveness of terrain along the avenue) and the size of the unit required to control it. Other contributing factors include maneuver space, fields of fire, and cover and concealment afforded by the key terrain itself. For example, an area where several trails converge may be key terrain for a company team, whereas an area in which several battalion-size avenues of approach join may prove key for a brigade. At the company team level, the commander must assess what terrain is key to his mission accomplishment. An example of key terrain for a company team in the attack could be a small hill or tree line that overlooks the enemy’s reverse slope defense. Securing this area may be critical in establishing a support by fire position to protect the breach force. The company team commander must also identify decisive terrain, which is key terrain that will have an extraordinary impact on the mission. Decisive terrain is relatively rare; it will not be present in every situation. By designating terrain as decisive, the commander recognizes that seizing and/or retaining it is an absolute requirement for successful accomplishment of the mission. Figure 2-7 lists several considerations that the commander can include in his analysis of key terrain. (NOTE: Figure 2-9 illustrates a sample MCOO with restricted terrain, avenues of approach, key terrain, and graphic control measures.)
Figure 2-7. Considerations in key terrain analysis. Avenues of approach. These are areas through which a unit can maneuver. The definition of an avenue of approach is an area that provides sufficient ease of movement and enough width (for dispersion) to allow passage of a force large enough to significantly affect the outcome of the battle. In turn, avenues of approach are composed of mobility corridors, which are areas through which the force will be canalized by terrain features and constrictions. In making his terrain analysis, the company team commander can use the following process to identify avenues of approach:
The commander must identify mounted, dismounted, and air avenues of approach within the sector or area of operations. Mounted forces may move on avenues along unrestricted or restricted terrain (or both). Dismounted avenues and avenues used by reconnaissance elements normally include restricted terrain and, at times, severely restricted terrain. In addition, the terrain analysis must identify avenues of approach for both friendly and enemy units. After identifying avenues of approach, the commander must evaluate each avenue. He determines the size and/or type of force that could use the avenue and evaluates the terrain that the avenue traverses as well as the terrain that bounds or otherwise influences it. Figure 2-8 lists several offensive and defensive considerations that the commander can include in his evaluation of avenues of approach.
Figure 2-8. Considerations in avenue of approach analysis. |
|||||||||||||
|
|
Figure 2-9. MCOO showing restricted terrain, avenues of approach, and key terrain.
Weather analysis. Consideration of the effects of weather conditions is an essential part of the mission analysis. The commander should review the results of his terrain analysis and determine the impact of the following factors on terrain, personnel, and equipment and on the projected friendly and enemy COAs. Light data. At what times are BMNT, sunrise, sunset, EENT, moonrise, and moonset? Is the sun to the back of friendly forces or the enemy? What effect will this have on either force’s ability to see? Will friendly forces have to remove or install driver’s night periscopes during movement? When during the operation will they have to use night vision goggles? What effect will long periods of darkness (such as during winter nights) have on soldiers’ ability to stay awake and alert? Precipitation. How will precipitation affect the terrain along each avenue of approach? Will some restricted terrain become severely restricted if it rains or snows? Will moist air cause foggy conditions? Will lack of precipitation cause extremely dusty conditions? How will fog, dust, or stormy conditions affect visibility? Temperature. What will the temperature be during the operation and what effect will this have on soldiers? Will they be able to sustain a long fight in extreme conditions? Will the ground freeze or thaw during the operation? What effect will this have on trafficability? How will extreme heat or cold affect the optical images in the vehicle sights? Will changes in the temperature and barometric pressure require MRS updates on the tanks? How often? Are temperature dispersions favorable for the use of smoke or chemicals? Wind speed and direction. What is the expected wind speed and direction during the operation? What effect will wind conditions have on use of smoke, flares, or chemical agents? Will the wind affect dust, fog, and other battlefield conditions? Visibility. How will weather conditions (including light conditions, precipitation, temperature, and wind speed and direction) affect visibility? Will friendly forces have the sun in their eyes? Will the wind blow dust or smoke away from the route of march (making it easier to see) or back toward friendly forces? Under such conditions, what is the maximum observation range? How will that range affect the enemy? Troop analysis (available assets). Analyze the combat readiness of troops and equipment task organized to the team, including attachments. Direct subordinate leaders to outline the readiness status of their elements; if possible, inspect each element to verify readiness. Compile updates of each vehicle’s maintenance, fuel, ammunition, and personnel status. Determine the anticipated readiness status, as of the time the operation is to start, of vehicles and equipment that are currently nonmission-capable (NMC). Time analysis. Identify the specific and implied times governing actions that must occur throughout the planning, preparation, and execution phases of the operation. Assess the impact of limited visibility conditions (including darkness) on the troop-leading process and other time-sensitive preparations for the company team and its subordinate elements. (NOTE: Figure 2-10 illustrates a method of analyzing usable light and limited light conditions.) Analyze the timing for the execution phase in terms of the terrain and enemy and friendly forces. Update previous timelines, listing all events that affect the company team and all subordinate elements. Figure 2-11 illustrates a sample company team planning timeline. |
|||
 |
Figure 2-10. Use of time analysis to assess light conditions for an operation.
Analysis of civilian considerations. Identify any civilian considerations that may affect the company team mission. These factors may include refugees, humanitarian assistance requirements, or specific considerations related to the applicable ROE and/or ROI. |
|||
 |
Figure 2-11. Troop-leading procedures in the parallel planning process.
Step 2 - |
Based on his restated mission and the information compiled thus far in the troop-leading process, the commander issues as detailed a warning order as possible. The company team warning order, usually given orally, allows subordinate units to continue with the planning and preparation activities that started with the initial warning order. The commander should not delay issuing the order while awaiting additional information; likewise, he should not withhold needed information, even if it is somewhat incomplete. He can send updates as needed using subsequent warning orders. As a minimum, the company team warning order should include the elements outlined in the following paragraphs. |
||
| Situation (enemy and friendly) |
At this point in the troop-leading process, the commander has normally had time to conduct a detailed mission analysis. The goal of the warning order is to allow his subordinates to start their own mission analysis. Provide a layout of the terrain using the five military aspects of terrain (if this was not done earlier). Include results of the enemy analysis. Give the intent and mission statements of the commander two levels up. Brief the task organization and the higher concept of the operation. Allow subordinates to copy the draft SITEMP, if available, and all available operational graphics. |
||
Mission |
Give the restated company team mission. |
||
| Coordinating instructions |
Provide any instructions that will allow for proactive planning and preparation, including priorities of work and the unit security plan. As part of the coordinating instructions, the commander may find it useful to provide a timeline that includes an assessment of the troop-leading procedures conducted at the task force, company team, and platoon levels as a means of deconflicting leader responsibilities at each level. (NOTE: Figure 2-11 illustrates a timeline that could be used for this purpose.) In addition, specify what types of mission-specific rehearsals (for example, covering actions on contact, breaching, or support by fire) that you expect subordinate units to conduct within the framework of their timelines. |
||
Service support |
Address any changes to the support requirements (such as the addition of an engineer platoon) for which the XO, 1SG, or subordinate leaders may have to plan. |
||
Step 3 - |
Using results of his METT-TC analysis, his knowledge of the situation, and other available resources, the commander begins development of his tentative plan. He can use the techniques and principles outlined in the following paragraphs. |
||
SITEMP updates |
The commander continues to update his SITEMP using refined versions of the S2’s SITEMP and the intelligence annex from the task force OPORD (both should be available by this time). He can use additional information, including results of the company team’s reconnaissance and of task force reconnaissance and security operations, as it becomes available during the troop-leading process. |
||
COA development |
The purpose of COA development is simple: to determine one or more ways to achieve the mission, in most cases by applying the company team’s combat power to defeat the enemy at the decisive point in the battle. The commander makes each COA as detailed as necessary to describe clearly how he plans to use his forces to achieve the unit’s tasks and purpose. He focuses on the actions the unit must take at the decisive point. When time permits, the commander should develop several COAs for the company team. The spectrum of COAs should provide enough flexibility, and cover enough different possible situations, to achieve the unit purpose against each likely enemy COA that was identified previously in the troop-leading process. In developing COAs, the commander must ensure they meet the following criteria:
There are normally six steps in COA development. The following paragraphs describe each step in detail. COA Step 1 - Analyze relative combat power. Combat power is created by combining the elements of maneuver, firepower, protection, and leadership in combat against the enemy. The commander applies the effects of these elements with other potential CS and CSS assets. The purpose of analyzing relative combat power is to identify enemy strengths and weaknesses, to identify friendly strengths and weaknesses, and to determine whether the company team has adequate combat power to defeat the force against which it is arrayed. COA Step 2 - Generate options. The commander must first identify the decisive points or times at which the unit will mass the effects of overwhelming firepower to achieve a specific result (with respect to terrain, enemy, and/or time) that will accomplish the unit’s purpose. This will be the company team’s main effort. The commander must next identify any supporting efforts; these are tasks other than the main effort that must be accomplished to allow the main effort to succeed. The commander then determines the purposes of the main effort and the supporting efforts. (NOTE: The main effort’s purpose is directly related to the mission of the unit, while the supporting efforts’ purposes relate directly to the main effort.) The commander can then identify the essential tasks that will enable the main and supporting efforts to achieve their purposes. Figure 2-12 depicts company team purposes for a breaching operation. COA Step 3 - Array initial forces. The commander must then determine the specific number of combat systems necessary to accomplish each task. He should allocate resources to the main effort and continue with supporting efforts in descending order of importance. For example, the main effort in a breaching operation may require four tanks and three plows, whereas a supporting assault force, required to fight for terrain, may call for BFVs and infantry squads. |
||
 |
Figure 2-12. Identification of company team purposes in a breaching operation.
COA Step 4 - Develop schemes of maneuver. Applying information from the analysis of terrain and enemy, the commander links the company team’s tasks in schemes of maneuver. He determines how the achievement of one task will lead to the execution of the next. He identifies the best ways to use the available terrain and how best to employ the team’s strengths against the enemy’s weaknesses. The commander then develops the maneuver control measures necessary to convey the commander’s intent, enhance understanding of the schemes of maneuver, prevent fratricide, and clarify the tasks and purposes of the main and supporting efforts. COA Step 5 - Assign headquarters. The commander assigns specific elements as the main and supporting efforts. COA Step 6 - Prepare COA statements and sketches. The commander’s ability to prepare COA sketches and statements will depend on the amount of time available. Whenever possible, he should prepare a sketch showing each COA to clarify maneuver aspects of the COA; he should also prepare a statement describing specific actions that may occur. Figure 2-13 shows a sample COA sketch and COA statement. |
|||
Analysis of COAs |
After developing the COAs, the commander must analyze them to confirm that the criteria for valid COAs are met, to determine the advantages and disadvantages of each COA, and to visualize the flow of the battle. Typically, he war-games each friendly COA against each likely enemy COA. If time is limited, he may choose to employ the box technique of war-gaming, analyzing only the most critical event in each friendly COA against the corresponding enemy action. (NOTE: If the commander uses this technique, he must be prepared to conduct more detailed war-gaming later to complete the plan.) |
||
COA comparison |
After war-gaming the COAs, the commander must compare them, weighing the specific advantages, disadvantages, strengths, and weaknesses of each course as noted during the war game. These attributes may pertain to the accomplishment of the company team purpose, the use of terrain, the destruction of the enemy, or any other aspect of the operation that the commander believes is important. The commander uses these factors as his frame of reference in tentatively selecting the best available COA. He makes the final selection of a COA (during completion of the plan) based on this comparison, taking into account results of the company team’s reconnaissance and the reconnaissance and security operations of the task force and brigade. |
||
| Tentative plan warning order (warning order #3) |
The commander may use a warning order to outline his tentative plan for subordinates and to issue instructions for reconnaissance and movement (as necessary). The order should clearly and briefly cover key aspects of the tentative plan: the purpose and result (end state) of the operation; the company team’s essential tasks; when the operation begins; the area of operations; the scheme of maneuver; and subordinate unit tasks and purposes. In describing his concept, the commander should emphasize that the plan remains generally unrefined, with many of the details to be clarified through additional war-gaming and issued in the OPORD. This warning order is important because it allows subordinates to see how the commander is developing the plan; it allows them to begin (or continue) mission analysis based on their elements’ assigned tasks and purposes. |
||
Step 4 - |
The commander initiates any movement that is necessary to continue preparations or to posture the unit for the operation. This may include movement to an assembly area, BP, or attack position; movement of reconnaissance elements; or movement to compute time-distance factors for the unit’s mission. |
||
 |
Figure 2-13. COA sketch and statement.
Step 5 - |
This step covers the necessary reconnaissance that allows the commander to refine the unit’s plan. Even if the company team commander has made a leader’s reconnaissance with the task force commander and staff at some point during troop-leading procedures, he should still conduct a reconnaissance of his own with the team’s subordinate leaders. This will allow them to see as much of the terrain and enemy as possible; it should also help each leader to visualize the projected plan, and any related branch plans, more clearly. At the team level, the leader’s reconnaissance may include movement to or beyond the LD or a drive from the FEBA back to and through the engagement area along likely enemy routes. If possible, the commander should select a vantage point that provides the group with the best possible view of the decisive point. In addition to the leader’s reconnaissance, the company team may conduct more detailed reconnaissance operations. Examples include surveillance of an area by subordinate elements, patrols by infantry squads to determine where the enemy is (and is not) located, and establishment of OPs to gain additional information. The nature of the reconnaissance, including what it covers and how long it lasts, depends on the tactical situation and time available. The commander should use the results of the COA development process to identify information and security requirements for the team’s reconnaissance operations. |
||
Step 6 - |
Completion of the plan includes several steps that transform the commander’s intent and concept into a fully developed OPORD. These steps, examined in detail here, are the following:
| ||
| Complete the plan Step 1 - Select a COA |
The company team commander makes this selection based on his comparison of the alternative COAs (conducted earlier as part of troop-leading step 4, make a tentative plan), results of the team’s reconnaissance, and information gained through task force and brigade reconnaissance and security operations. |
||
| Complete the plan Step 2 - Conduct detailed war-gaming |
This is normally a more time-intensive process than the initial war-gaming of the COAs. By war-gaming the plan again, this time in more detail, the commander can better visualize how the fight will occur, determine when and where he will need to make decisions, and identify when and where he must employ CS and CSS assets. The end result of war-gaming is a fully integrated plan that includes a detailed operations overlay, a detailed direct fire plan, an integrated indirect fire plan, refined obstacle and ADA plans, and a complete company team CSS plan. Purposes of war-gaming. The commander uses the detailed war-gaming process to assist him in accomplishing these planning and preparation objectives:
War-gaming guidelines. The commander and subordinate leaders should use the following procedures and considerations in conducting detailed war-gaming:
War-gaming techniques. The commander can choose among three basic war-gaming techniques (the box, the belt, and avenue in depth) in the analysis of friendly COAs. He and the subordinate leaders can use any one technique or a combination to help them visualize the battlefield or look at the battle in a logical sequence. In doing this, they should avoid becoming unduly concerned with the structure of the war game. Rather, they should remain focused on its purpose, adapting the war-gaming techniques as necessary to accomplish the purpose. Box technique. The box method focuses the war game on a specific area of the battlefield. This may be the objective area, the engagement area, or some other critical location where the decisive action will take place. Determine the size of the box based on the specific situation; it should include all of the units, friendly and enemy, that will have a direct impact on the decisive action. This technique is a good one to use when time is limited because of its focus on the decisive action. A key disadvantage, however, is that in considering only actions at the decisive point the commander may overlook other critical actions or events that could have a significant impact on the company team’s mission. Belt technique. The belt technique allows the commander to divide the COA into phases or belts. This may be done in several ways, such as from phase line to phase line or by significant event. Each phase is then war-gamed in sequence. This approach is most effective for offensive COAs. As an example, an offensive operation can be divided into these phases or belts:
Avenue in depth technique. This method is most effective during war-gaming of a defensive COA, especially when there are several avenues of approach to consider. Using the enemy’s most probable COA, the commander and subordinate leaders analyze friendly and enemy actions along one avenue of approach at a time. Additional war-gaming considerations. In addition to the selected war-gaming technique, several other factors will have an impact on how the commander and subordinate leaders carry out the war game. The following discussion focuses on the participants, procedures, and other considerations for conducting the process. Participants. As noted, the company team’s subordinate leaders should assist the commander in conducting the war game. Participants may include the XO, 1SG, platoon leaders, PSGs, FSO, engineer platoon leader, ADA section leader, and company team master gunner. Ensure that everyone who takes part thoroughly understands all projected friendly and enemy COAs and is ready to contribute to the process. At a minimum, the commander should conduct the war game with the XO playing the role of the enemy commander. (NOTE: Based on the team’s priorities of work, some leaders listed here may not be available for the war-gaming session.) Terrain. Incorporate the results of the leader’s reconnaissance into the MCOO. Reevaluate the terrain to ensure that the classification (severely restricted, restricted, or unrestricted) is correct. Enemy capabilities. Update the SITEMP with new enemy information. Ensure that each participant thoroughly understands the enemy’s capabilities and limitations and that each knows the difference between known and suspected enemy positions. One technique is to make leaders of the team’s CS attachments responsible for learning and reporting their enemy counterparts’ capabilities; for example, the FSO is responsible for threat artillery systems, the ADA section leader (if task organized to the team) for threat ADA, and so forth. Evaluate how and when the enemy can affect the company team using the seven forms of contact:
NOTE: For a detailed discussion of actions on contact, refer to Chapter 3 of this manual. Friendly forces. Assess current maintenance and personnel status reports to determine whether the combat power of any adjacent units will affect the company team plan. For example, if the breach force (another task force element) has two inoperative plows while the team’s are operational, the commander can assume that the task force will direct him to cross-attach two of his plows. Assumptions. Specify assumptions that were made during the COA development process so that participants understand the underlying doctrinal principles and objectives. |
||
| Complete the plan Step 3 - Finalize the plan |
After concluding the war-gaming process, the commander takes the actions outlined in the following paragraphs to complete the plan (including any branch plans) and wrap up preparations for the upcoming operations. He includes any additional activities that he and the team’s subordinate leaders believe will contribute to unit readiness. Begin bottom-up refinement. This process includes developing refinements, additions, and deletions to the task force plan and submitting them to the appropriate member of the task force staff. For example, if the task force fire support plan allocates a smoke target to screen company team movement, the commander may discover during war-gaming that the target is not in a correct position to support the team. He would then direct the team FSO to submit a change to the target list. Finalize CSS integration. After estimating how many casualties and disabled vehicles the company team will incur and pinpointing expected locations for these losses, the commander integrates the team’s CSS requirements into paragraph 4 of the OPORD. This includes (but is not limited to) such factors as the location of unit casualty and maintenance collection points, times when company team assets will occupy them, routes to task force CSS sites, and security procedures for CSS assets. Refer to Chapter 7 of this manual for a more detailed discussion of CSS planning. Identify command and control requirements. Based on their visualization of the fight, the commander and subordinate leaders identify other command and control requirements that will be necessary to ensure the success of the mission. Covered in paragraph 5 of the OPORD, these include graphic control measures, signals, locations of the commander and XO, and communications during the fight with other units and/or commanders. Finalize graphics. The commander must be sure to add company team graphics to the task force overlay. (NOTE: One technique is to use a different color to distinguish the team’s operational graphics from existing task force graphics.) Most of these additions should have been made during war-gaming. Examples could include the following:
|
||
| Complete the plan Step 4 - Prepare the OPORD |
The company team commander begins this step by finalizing his orders products. Examples include the following items:
The commander must decide how these products will be produced and distributed to the company team’s subordinate elements. One technique is to employ personnel from the team headquarters in production and distribution tasks, such as building terrain models and copying graphics or matrices. The commander must also establish a quality control system to ensure that all products are complete and accurate. (NOTE: Refer to the discussion of the functions of the company team CP.) When time is short, the commander must weigh the need for a lengthy, thoroughly detailed written OPORD against the value of a relatively brief, but still well-developed, plan that he can explain orally and visualize through the use of maps and models. At the company team and platoon levels, there often is not enough time to write out every single detail of a thorough five-paragraph OPORD. Also, subordinates will find it difficult to copy pertinent information and still listen as the commander issues the order. It is advisable, therefore, to provide a detailed, but concise, document that summarizes the essentials of the order. Subordinates can then listen carefully as the commander explains (and illustrates) the details of the order, writing down only the most essential items. |
||
Step 7 - |
The OPORD should precisely explain, both verbally and visually, the commander’s intent, providing enough information to ensure that all subordinate elements work toward the desired end state. When the commander has finished issuing the order, subordinate leaders should walk away with a clear mental picture of what he expects their elements to do. |
||
OPORD format |
The format of the five-paragraph OPORD is organized to help the commander paint a picture of all aspects of the operation, from the terrain to the enemy and finally to the unit’s own actions from higher to lower. The format assists him in deciding what relevant details he must include and in providing subordinates with a smooth flow of information from beginning to end. At the same time, the commander must ensure that the order is not only clear and complete but also as brief as possible. If he has already addressed an item adequately in a previous warning order, he then can simply state "no change" or provide any necessary updates. Refer to Appendix A of this manual for a discussion of OPORD format. |
||
Location and time |
The commander should select a location from which to issue the OPORD that is secure and will help enhance understanding of the order. An ideal site, when time and security factors allow, is one that overlooks the battlefield. Whenever possible, the commander should avoid issuing the order during hours of darkness. If he must issue the order at night, he chooses a location (such as inside a well-lighted tent) that allows subordinates to see visual materials clearly. In daylight hours, he then takes the order group to a favorable vantage point to clarify the plan. |
||
Presentation |
During the orders briefing, the commander may make use of the visual materials developed earlier to help paint the picture of how the fight will unfold. Subordinates will better comprehend complex ideas and situations with the aid of a sketch, diagram, or model. The commander should further ensure that subordinates keep their maps, with graphics posted, on hand for reference. As noted, he may furnish copies of the written order (or a summary of key details). He then must present the plan clearly and logically, providing only updates (not complete restatement) of items he has covered in earlier warning orders or FRAGOs. |
||
| Confirmation brief techniques |
At the conclusion of the OPORD briefing, the commander answers any questions, then conducts a walk-through confirmation brief (this is not a rehearsal) on a terrain model that provides accurate representations of the terrain, the enemy, and friendly graphics. The focus of the confirmation brief is on the elements of what, why, and how for execution of the company team’s mission; it covers subordinates’ specific tasks within the plan. The commander should avoid questioning subordinates specifically how they will execute their tasks because they have not yet formulated their own plans. Rather, he uses the confirmation brief to further clarify the scheme of maneuver for them and to give them a feel for how they will work in concert with one another to achieve the unit purpose. Subordinate leaders should use the confirmation brief to discuss issues related to the company team timeline and their own timelines. |
||
Step 8 - |
The best plan may fail if it is not managed effectively and efficiently. Throughout the troop-leading process, the commander must continue to refine the plan, conduct coordination with adjacent units, and supervise combat preparation and execution. Inspections and rehearsals are critical elements of this step. |
||
Precombat training |
During continuous combat operations, units at all levels should have either formal or informal combat zone training programs to convert new ideas into actual practice. This allows soldiers to practice a variety of skills that will enhance their protection and endurance during extended combat. For example, after receiving his mission, the company team commander should assess the team’s proficiency in the individual, leader, and collective tasks required for the upcoming mission. If he feels the team, or a subordinate element, cannot perform a task properly, he can then conduct precombat training during the planning and preparation phases. |
||
Inspections |
Inspections allow the commander to check the company team’s operational readiness. The key goal is to ensure that soldiers and vehicles are fully prepared to execute the upcoming mission. Inspections also contribute to improved morale. It is essential that the entire company team chain of command know how to conduct precombat checks (PCC) and precombat inspections (PCI) in accordance with applicable unit SOPs and guidelines from FM 7-7J, ARTEP 71-1-MTP, and ARTEP 17-237-10-MTP. Leaders should focus on the readiness of mission-essential equipment and ammunition and on the mission understanding of all subordinate leaders and individual soldiers. Procedures for a comprehensive program of checks and inspections include the following:
Each leader should observe his element throughout the process of preparation for combat. The commander should conduct the final inspection of each element once the leader reports that soldiers, vehicles, and equipment are prepared. |
||
Rehearsals |
Rehearsals are practice sessions conducted to prepare units for an upcoming operation or event. They are essential in ensuring thorough preparation, coordination, and understanding of the commander’s plan and intent. Company team commanders should never underestimate the value of rehearsals. Effective rehearsals require leaders and, when time permits, other company team soldiers to perform required tasks, ideally under conditions that are as close as possible to those expected for the actual operation. At their best, rehearsals are interactive; participants maneuver their actual vehicles or use vehicle models or simulations while verbalizing their elements’ actions. During every rehearsal, the focus is on the how element, allowing subordinates to practice the actions called for in their individual scheme of maneuver. (NOTE: A rehearsal is different from the process of talking through what is supposed to happen. For example, in a rehearsal, platoon leaders should actually send SPOTREPs when reporting enemy contact, rather than simply saying, "I would send a spot report now.") |
||
Purposes of rehearsals. The commander uses well-planned, efficiently run rehearsals to accomplish the following:
|
|||
Rehearsal scope and techniques. The company team commander can choose among several approaches in conducting rehearsals. He must decide on the scope of the rehearsal in terms of participation and on the specific rehearsal technique to be used. As a general guideline, rehearsals should follow the crawl-walk-run training methodology to prepare the team and subordinate elements for increasingly difficult conditions. Scope. The company team can prepare for operations using reduced-force rehearsals and/or full-force rehearsals. These considerations apply:
Techniques. Rehearsal techniques include the following:
- The company team may rehearse with platoons or other team elements going "force on force" against each other. - The company team trains can portray enemy forces to prompt action by the platoons or other team elements. - The entire team may go against another task force element. |
|||
Rehearsal guidelines. The company team commander is responsible for most aspects of the team’s rehearsals. The following paragraphs outline procedures and considerations that affect the rehearsal process. General. The commander will select the tasks to be practiced and will control execution of the rehearsal. He will usually designate someone to role-play the enemy elements he expects to face during the operation. Conditions. Rehearsal situations should be as close as possible to those expected during the actual operation. This includes the physical aspects of the rehearsal site as well as such factors as light and weather conditions. Actions before the OPORD is issued. Initial warning orders should provide subordinate leaders with sufficient detail to allow them to schedule and conduct rehearsals before the company team OPORD is issued. For example, if breach, support, and assault elements are identified in an early warning order, leaders can begin rehearsing mission-specific tasks, drills, and SOPs for each element early in the troop-leading process. Rehearsals after the OPORD can then focus on tasks that cover integration of the entire team. Progression of rehearsal activities. Rehearsals begin with soldier and leader confirmation briefs to ensure understanding of individual and unit tasks. Individual elements and the company team as a whole then use sand tables or sketches to talk through the execution of the plan. This is followed by walk-through exercises and full-speed mounted rehearsals. Rehearsal priorities. The company team commander establishes a priority of rehearsals based on the time available and the relative importance of the actions to be rehearsed. As with COA development, the priority should begin at the decisive point of the operation and move on to actions that are less critical to the plan. As an example, the commander’s priorities could call for rehearsal of tasks and drills in this order: actions on the objective, actions on contact, reaction to an air attack, movement formations and techniques, medical treatment and evacuation, and resupply operations. |
|||
Refinement |
At all times, the company team commander must ensure that the team has an accurate picture of the enemy situation and that the plan to defeat the enemy is relevant to the enemy’s current disposition. This means that the company team plan must continue to evolve as the enemy situation develops. As discussed previously, the team will receive a constant stream of additional information about the enemy before the operation starts through a combination of team-, task force-, and brigade-level reconnaissance and security operations. The commander uses this information to continually adjust the plan as necessary. Changes to the plan and the enemy situation must be disseminated down to the lowest organizational level. Although these constant updates may cause some disruption of troop-leading procedures at the platoon level, the refinement process is critical to the success of the company team plan. NOTE: Refinement of the plan does not stop when the company team crosses the LD. Once the operation is under way, the commander continues to adjust the plan based on the enemy’s actions and the terrain on which the team is operating. The commander gains additional information through reports and the company team’s own development of the situation. He uses FRAGOs to update the team on refinements to the plan. | ||
| Additional preparation tasks |
To assure himself of adequate time to focus on his own critical troop-leading tasks, the company team commander must effectively delegate the numerous preparation tasks that are part of the troop-leading process. One technique is to use members of the company team headquarters to assist in completion of these activities. Available personnel may include the company team master gunner, NBC NCO, and communications specialist and the crews from the commander’s, XO’s, and 1SG’s vehicles. (NOTE: Refer to the discussion of company team CP functions in this chapter.) Additional preparations delegated by the commander may include, but are not limited to, the following tasks:
|
||
Abbreviated |
When there is not enough time to conduct all eight troop-leading steps in detail, such as when a change of mission occurs after an operation is in progress, the company team commander must understand how to trim the procedures to save time. Most steps of these abbreviated troop-leading procedures are done mentally, but the commander skips none of the steps. Once the order is received, he conducts a quick map reconnaissance, analyzes the mission using the factors of METT-TC, and sends for the subordinate leaders. He makes sure each leader posts the minimum required control measures on his maps, then issues a FRAGO covering the key elements of the enemy and friendly situations, mission, commander’s intent, and concept of the operation. The service support and command and signal paragraphs can be deleted if they are unchanged or covered by SOP. The commander and subordinate leaders may also conduct a quick walk-through rehearsal of critical elements of the maneuver plan using a hastily prepared terrain model or sand table. In some cases, there may not be enough time even for these shortened procedures. The company team may have to move out and receive FRAGOs from the task force by radio or at the next scheduled halt. It then becomes critical for the team commander to send FRAGOs of his own to the subordinate leaders explaining the team’s purpose within the overall task force maneuver plan. At all times, the commander, XO, 1SG, and subordinate leaders share the responsibility for keeping the team informed of the ever-changing enemy and friendly situations. They accomplish this by monitoring the task force net and issuing frequent updates to their elements using available communications assets. Digital information systems (such as IVIS, DBCS, EPLRS, and appliqué) and global positioning systems (GPS) are valuable tools when the company team is forced to use abbreviated troop-leading procedures and FRAGOs. These systems allow the commander to communicate information quickly and accurately; he can also use them to designate waypoints to assist in navigation and TRPs to assist in weapons orientation. Other keys to success when abbreviated procedures are in effect include a well-trained company team; clearly developed, thoroughly understood SOPs; and an understanding by all members of the team of the current tactical situation (situational awareness). Whenever time is available, however, there is no substitute for effective, thorough troop-leading procedures. The odds of success increase still further when detailed planning and rehearsals are conducted prior to an operation, even if time is limited. Successful commanders and leaders make the most of every available minute. |
||
The company team must treat the succession of command as a type of drill. The commander must ensure that all leaders understand the procedures required for a smooth succession; ideally, he should conduct rehearsals of the succession process. The normal succession of command in a company team is the following:
When casualties or other battlefield factors necessitate succession, the new commander acts quickly to reestablish the chain of command. He establishes communications with the task force and all elements of the company team and informs them of the situation. (NOTE: All elements of the company team should have preset their radios to facilitate a smooth transition in case a change of command becomes necessary.) The new commander compiles status reports within the company team, receives and analyzes any new orders from the task force, and continues operations. He issues FRAGOs as required. NOTE: In most situations, the leader in the best position to control the company team fight should assume command. For example, the platoon leader of the assault force may have a better understanding of a critical part of the battle than does the XO and would be better suited to take command until the XO is in position to do so. |
|||
Nonorganic combat and CS assets can significantly enhance the company team’s combat capability. These elements support the company team under established command and support relationships. Regardless of the nature of the relationship, the company team commander is responsible for the integration and synchronization of these assets within the team’s scheme of maneuver. |
|||
Command |
The command relationship defines the degree to which a command owns, controls, and supports various elements of another unit, such as the company team. There are four types of command relationships:
|
||
Support |
Supporting and supported units share specific relationships and responsibilities. For example, the assigning headquarters retains both logistical support responsibility and the authority to reorganize or reassign all or part of a supporting force. Although support relationships usually do not occur at the company team level, it is important to understand how they affect the type of support the task force or brigade provides and/or receives. The following paragraphs discuss the four types of support relationships. |
||
Direct support |
The DS unit provides support in response to a direct request from another unit. It is not attached to or under the command of the supported unit, but it is required to report directly to that unit and provide any requested support. DS units also must provide or arrange their own support. An example of this type of support unit during defensive operations is a task force DS engineer company. In the offense, operating system assets may be tasked to provide DS to the company team (normally when it is the task force main effort). In light/heavy operations, tank sections, platoons, and companies may serve as DS elements. |
||
Reinforcing |
In this type of support, a unit provides reinforcing fires or support for another unit; as a secondary mission, it remains responsive for DS requests. |
||
General support |
The GS unit provides support to the supported force as a whole and not to any particular subunit. GS units are responsible for their own logistical support. From the company team perspective, these units provide area, not unit, support. An example of a GS unit would be BSFVs or Bradley Linebackers attached to the brigade but positioned in the task force area of operations to cover air avenues of approach into the brigade rear. |
||
| General support reinforcing |
In addition to performing its primary support tasks, the supporting unit in this type of relationship has the secondary mission of providing reinforcing fires to another force. This relationship usually pertains to artillery units. |
||
SECTION 2 - CONTROL |
|||
Control, the counterpart of command, is the process by which the commander follows up a decision and minimizes deviation from his concept. It entails supervision of all aspects of the operation, including synchronization of all systems and activities. |
|||
Situational awareness is the ability to maintain a constant, clear mental "picture" of the tactical situation. This picture includes an understanding of relevant terrain and of the relationship between friendly and enemy forces in time and space. It also includes the ability to correlate battlefield events as they develop. |
|||
Decision-making |
For the company team commander and all subordinate leaders, situational awareness is the key to making sound, quick tactical decisions. It allows them to form logical conclusions and to make decisions that anticipate future events and information. A critical benefit of situational awareness on the part of all leaders is a reduction in fratricide incidents. Situational awareness also gives leaders the ability to compress the time necessary to conduct troop-leading procedures; this is especially critical when there is limited time to plan and prepare for an operation. | ||
Structure of |
The commander structures the battlefield based on his intent and the factors of METT-TC. How he does this affects his subordinate leaders’ mission planning and their ability to maintain situational awareness. The framework of the battlefield can vary from a highly rigid extreme, with obvious front and rear boundaries and closely tied adjacent units, to a dispersed and decentralized structure with few secure areas and unit boundaries and no definable front and/or rear boundary. Between these extremes is an unlimited number of possible variations. Maintaining situational awareness becomes more difficult as the battlefield becomes less structured. Modern, highly mobile operations involving small forces lend themselves to a less rigid framework that challenges the leader’s ability to maintain an accurate picture of the battlefield. |
||
"Seeing" the |
To "see" the battlefield accurately, the commander and subordinate leaders must have virtually perfect knowledge of the friendly situation one level higher than their own (the task force or company team/troop situations). It is also vital that the commander update subordinates periodically on the higher situation. The commander must also have a relatively complete knowledge of the terrain and the enemy situation. He must be able to visualize enemy and friendly elements through time and to picture how terrain will affect their actions. (NOTE: This requirement to maintain a real-time awareness of the battlefield one level higher does not relieve the commander of his responsibility to understand the situation and commander’s intent two levels higher than his own. The difference is that his understanding of the situation two levels higher does not have to be as specific or as timely.) Most of the information the commander requires comes from what he can observe from his tank or BFV and receive through his communications systems, which he monitors both from reports addressed specifically to him and by eavesdropping. He then can track enemy and friendly elements and plot all movement on his map and/or digital display (IVIS, DBCS, or appliqué). This allows him to adjust movement so the company team makes contact with the enemy from positions of advantage. How effectively the commander can keep track of events on the battlefield is, to some degree, experience-dependent. No matter what his experience level, however, he is responsible for learning techniques that allow him to relate the information he is receiving to his map or display and thereby track the tactical situation. Personal preparation is absolutely critical to any leader’s performance during operational execution. The commander must carefully evaluate what he will be required to do during the battle and then take the necessary actions to prepare for the upcoming operation. |
||
Battle space |
The ability to see the battlefield provides the commander with important tactical information, including friendly and enemy positions and relevant terrain. In turn, complete understanding of the military significance of this picture requires knowledge of the concept of battle space; this is the key element in the intellectual process of visualizing the battlefield. At the most fundamental level, battle space is the three-dimensional area in which the company team and its subordinate elements can acquire enemy forces and influence them with effective fires. This space is defined by several battlefield factors: the locations of friendly forces, including the team’s individual elements and OPs; the effects of terrain, weather, and movement; and the ranges of all available weapons and sensing systems. Each subordinate element has its own battle space. The company team’s total battle space is the sum of the individual elements’ battle spaces. The team battle space is not restricted by boundaries; it can overlap the battle space of adjacent units. Battle space has applications in all phases of mission planning, preparation, and execution. During the planning process, it is a critical factor in the selection of the movement axis as well as tentative positions and potential engagement areas. In the preparation phase, battle space information aids leaders in determining where vehicle positions will be sited and to what level they will be prepared (dug). Once mission execution begins, the commander’s knowledge of his battle space is critical to his ability to issue timely and effective orders as the situation changes. The importance of battle space demands that the company team commander direct much of his battle command effort toward managing and enhancing his space. He must be aware at every moment of how battle space is changing as friendly and enemy forces move and as terrain and visibility conditions change. As the operation progresses, the commander must take active measures to shape the battle space to his best advantage. One vital step in this process is to eliminate or reduce any gaps, or dead space, within the company team’s battle space. The commander can accomplish this in several ways. In the offense, for example, he can maintain an overwatch element during movement through a choke point or a danger area. In the defense, he can emplace OPs or reposition elements or individual vehicles to cover potential gaps in the team’s battle space. In all cases, the company team’s position in relation to other friendly elements is an important factor in defining and enhancing the battle space. The commander can shape his space more effectively if he applies the principles of mutual support and thorough coordination with adjacent units. |
||
Reports exist to support the commander and to assist him in assessing his critical information requirements. Their format and use is normally mandated by unit SOP. With some exceptions, reports are not tied to a fixed schedule. Rather, they are submitted in these circumstances:
|
|||
Cycle of reporting |
In serving their primary purpose of keeping higher headquarters and adjacent units informed of changes in the situation, reports must be complete and accurate; at the same time, leaders must ensure that their reports are neither overly complex nor too frequent. As a general rule, leaders send increasingly detailed reports as the situation develops and as more information (and more time) becomes available during an operation. This concept is known as the cycle of reporting. As an example of this cycle, a platoon leader who encounters an enemy force immediately sends a contact report to the company team commander and then initiates actions on contact. Once he has developed the situation, he sends a SITREP, which outlines the nature of the contact, his own situation, and his recommendation of a COA in response to the contact. After executing the COA directed by the commander, the platoon leader sends an updated SITREP (in this case, a closure report) to inform the commander of the result of the operation (again covering how the situation has changed). |
||
Report guidelines |
Leaders at all levels should keep the following considerations in mind in preparing, submitting, and using reports:
|
||
Types of reports |
Company team commanders and other leaders receive and send reports in five general categories. Refer to the applicable SOP for unit-specific information on these groups. In general, company-level reports include the following:
- Contact report and SPOTREP, used to report enemy activity. - SITREP. Several variations of the SITREP are also available, including the modified SITREP, the SALT report (a modified SITREP that is used to quickly summarize the enemy situation by covering only the aspects of size, activity, location, and time), and the closure report, sent to make a final report on the end state or result of an operation or action. - Combat power report, which a unit uses to send assessments of friendly combat power to its higher headquarters. - Sensitive items report (SENSEREP), used to relay the status and accountability of sensitive items to higher headquarters. - Reports covering physical aspects of the area of operations. These include the report for bridges, overpasses, culverts, underpasses, or tunnels, known as the BRIDGEREP; the report for fords, ferries, and other water crossing sites, known as the CROSSREP; the route reconnaissance report, known as the ROUTEREP; the obstacle report; and the bypass report. |
||
SOPs articulate how the company team will conduct certain operations (or component actions within an operation). A well-rehearsed tactical SOP ensures quick, predictable actions by members of the team. It standardizes procedures for tactical road marches, assembly areas, communications, maneuver, engagement area development, CS, and CSS, as well as any other operations designated as critical by the commander. An effective SOP normally delegates responsibility for specific tasks to specific subordinate elements or individuals. Examples of SOPs are discussed throughout this manual. The maneuver portion of the company team SOP helps leaders to make quick, accurate decisions; in turn, this enhances the team’s ability to maintain the initiative, even when unexpected contact occurs. A maneuver SOP normally consists of a series of maneuver plans, sometimes referred to as plays, that can be executed with slight modifications based on a timely METT-TC analysis. Unlike platoon battle drills (discussed in Chapter 3 of this manual), plays allow the commander to account for friendly task organization, specific terrain, and a specific enemy. As a result, the maneuver SOP for a unit whose primary mission is to fight an infantry-based enemy in restricted terrain must be significantly different from that of a unit that must fight a mechanized enemy force in desert terrain. An effective technique in development of maneuver plays is to develop a sketch and statement similar to the COA sketch and statement, which were discussed earlier in this chapter. Figure 2-14 illustrates an example of a play from a company team maneuver SOP. |
|||
 |
Figure 2-14. Example SOP maneuver play for securing a choke point.
Introduction |
The company team communicates to control subordinate elements and weapons, to gather and pass information, and to call for fires. The commander must carefully plan the use of the team’s communications resources to ensure that he maintains redundancy and flexibility. He must understand the capabilities and limitations of the various means of communications available to the company team and the role that METT-TC factors play in determining which means will be used in a given situation. SOPs are a critical element of company team communications. They may prescribe when to use certain methods or establish priorities for reports and other types of transmissions. For units with digital capability, SOPs should standardize graphics and dictate how overlays are passed from the top down and from the bottom up. |
||
Means of |
The following discussion covers the capabilities, limitations, advantages, and disadvantages of the various means of communications available to the company team. |
||
Messengers |
When security conditions, resources, and time permit, the use of messengers is the preferred means of communications for the company team. It is the most secure means and generally is also very flexible and reliable. Messengers can deliver fire plans, status reports, and various types of messages. If possible, lengthy messages sent by messenger should be written to prevent confusion. |
||
Wire |
This method of communications is especially effective in static positions. The company team may employ a hot loop in defensive positions, OPs, and assembly areas. Wire is both secure and reliable, but it imposes strict limits on the mobility of the user. This could interfere with unit troop-leading procedures or other priorities of work. (NOTE: Wire can also be used on M1-series tanks and BFVs to facilitate communications with dismounted elements working with the unit. Wire is routed from inside the vehicle to an externally mounted phone.) |
||
Visual signals |
Visual communications are valuable in identifying friendly forces or transmitting prearranged messages quickly over short distances. Standard |
||
Sound signals |
This form of communications is mainly used to attract attention, transmit prearranged messages, and spread alarms. Sound signals, however, carry only short distances, and their range and clarity are greatly reduced by battle noise. In addition, since they are open to enemy interception, use of sound signals may be restricted for security reasons. They must be kept simple to avoid creating confusion. Prearranged meanings for sound signals must be covered in unit SOPs and SOIs. |
||
Radio |
The radio is the company team’s most flexible, most frequently used means of communications. It can quickly transmit information over long distances with great accuracy. It is also the least secure means, although secure equipment and the ability of SINCGARS to frequency-hop provide the company team with protection against most enemy direction-finding, interception, and jamming capabilities. To maintain effective radio communications, leaders must strictly enforce proper radio discipline and procedures and adhere to the following guidelines:
|
||
Digital systems |
IVIS and appliqué digital systems enable users to transmit digitally encoded information over SINCGARS or EPLRS radios to similarly equipped vehicles. When digitally linked, users receive updated position information for vehicles operating on the same radio nets or within a tactical internet. Reports and overlays can be sent and received within the confines of the digital routing matrix. Units in the routing matrix must use precise SOPs to dictate how the unit and specific users will send and receive overlays from the top down and from the bottom up. SOPs must also specify digital log-on procedures and address the duties of the NCS, which are more complex within a digitized unit. |
||
Company teram |
The company team transmits and receives tactical information over a variety of radio nets. The following paragraphs outline communications equipment and procedures used by the team’s leaders and its subordinate and attached elements. Figure 2-15 illustrates the organization of the company team radio net. |
||
Commander and XO |
The company team commander normally operates on the company team command net and monitors the task force command net. This allows the commander to fight the team effectively while remaining responsive to the task force commander as necessary. He operates on the task force net to provide tactical assessments to the task force commander; to send critical information to the task force commander and/or other company team commanders; and to respond as required by the situation or as requested by the task force commander. The XO monitors the team net and operates on the task force net, making him responsive to both the team and task force commanders. He normally handles routine traffic on the task force net. |
||
| Platoon leader and PSG |
Platoon leaders normally operate on their specific platoon nets and monitor the company team command net, while each PSG monitors the platoon net and operates on the company team net. This allows platoon leaders to fight their platoons effectively while PSGs remain responsive for routine traffic. Platoon leaders must also remain responsive to the commander via the company team net; they provide tactical assessments and other critical information to the commander and other platoon leaders as required or requested. |
||
 |
Figure 2-15. Company team command radio net.
| Other leaders and elements |
Other factors related to the company team’s radio nets include the following:
- Tactical fire direction system. Known as TACFIRE, this digital task force net employs either of two systems, the IFSAS or the AFATDS. - Task force fire support net (voice net). - Mortar fire direction net (voice or digital net). - Company team command net. |
||
| Preset capability | SINCGARS radios offer up to eight preselected settings (manual, cue, and up to six additional preset frequencies or hopset patterns). The company team SOP should specify how leaders will configure their radios so that the frequency can be changed in response to a variety of situations and requirements, such as succession of command, cross-talk, and integration of CS and CSS assets. | ||
Introduction |
COMSEC involves measures taken to sustain and protect radio communications against enemy detection and electronic warfare attacks; it covers actions taken to protect personnel, facilities, and equipment from the effects of friendly and enemy electronic warfare that can degrade or destroy a unit’s combat capability. Although the team is not usually the focus of interception, jamming, or direction-finding systems, proper COMSEC procedures are an absolute requirement for all operators. At the team level, COMSEC consists mainly of proper active protection measures and antijamming techniques for the specific equipment the unit is employing. For example, a company team with SINCGARS radios may try to avoid detection by employing its frequency-hopping capability at a low power setting (although use of a hot loop remains an option). |
||
Active protection |
When the company team must use nonsecure or damaged communications assets, effective use of active protection measures can delay or prevent the enemy from gaining important tactical information from the team’s radio transmissions. Active protection measures include the following procedures:
|
||
Antijamming |
Company team radio operators should use the procedures outlined in the following paragraphs to defeat the enemy’s jamming activities. (NOTE: These procedures may also apply to other types of communications interference.) |
||
Recognition |
If he detects or suspects radio interference, the operator must determine the cause. He should not immediately assume that he is being jammed; some other types of radio interference may resemble jamming "symptoms." The operator first removes the antenna to determine whether the signal is being generated internally by the receiver. If the interference decreases in intensity when the antenna is removed, interference is external, possibly the result of enemy jamming. |
||
Continued operation |
After identifying jamming as a possible cause of interference, the operator follows a simple rule: continue to operate unless ordered by the NCS to shut down or change frequencies. He must continue normal radio operations so the enemy will not learn that the interference is working; he should never mention over a nonsecure radio or frequency that he is being jammed. If the company team cannot continue to operate on the jammed net, operators should switch to the antijamming frequency and continue the mission. The commander may direct the XO to monitor the old frequency until all nodes have reestablished communications. |
||
Reporting |
Use a MIJI report, sent via a secure means of communications, to inform leaders that jamming has been detected. The MIJI report format, found in the SOI or unit SOP, usually contains the following information:
NOTE: Although not related to enemy activity, "hot mikes" and unintentionally keyed radio nets can severely limit the ability of the company team and subordinate elements to communicate effectively. The team commander and subordinate leaders must develop reporting and action procedures to prevent these problems. |
||
Purpose |
The company team CP assists the commander and his subordinate leaders in preparing for battles by providing a centralized point for information gathering and dissemination, coordination, time management, and tracking of unit status. |
||
The tank or mechanized infantry company team is generally limited to the use of a tent or one of its organic headquarters vehicles as the CP. Tank company team options include the use of the 1SG’s M113 or the FIST-V. The 1SG’s vehicle is organic to the team and thus is more likely to be available during the preparation phase. The FIST-V is large enough to serve as the CP, but it may be retained by the task force and therefore will not be available to the company. The mechanized infantry team may use one of its headquarters BFVs, the 1SG’s M113, or the FIST-V. Disadvantages in using a BFV are that it may be required for a mounted rehearsal and that it will be required for boresighting. The use of an additional shelter can enhance the capabilities of any type of vehicle CP. A canvas or modular extension will provide additional room to allow CP personnel to perform their functions more efficiently. Another CP technique is the use of a GP-small tent in conjunction with radio remotes. |
|||
Manning |
There are several options for manning a company team CP. A senior NCO from the headquarters section or an attached element may be designated as information manager or NCOIC of the CP. Although the primary duty of this NCO may pull him away for limited periods, he can generally remain available for duty in the CP. Options include the master gunner, NBC NCO, or a senior gunner on a headquarters section BFV or tank. Other positions in the CP can be manned on a rotational basis by the members of the headquarters section or attached elements. These may include the crews of headquarters tanks or BFVs; company team medics; the driver of the 1SG’s M113; the communications specialist; and the crew of the FIST-V. |
||
Functions |
The company team CP assists the commander by reducing the number of items he must personally track and report. This further frees the commander to conduct troop-leading procedures during the preparation phase. Examples of CP operations include the following:
The CP may act as the point of contact for attached or OPCON units. It can further assist the commander in his troop-leading procedures by providing a variety of services: supervising and enforcing the timeline; reproducing overlays; converting acetate overlays to digital format (in digital units); constructing sand tables for company team and platoon rehearsals. |
||
Suppressing or destroying the enemy with direct fires is fundamental to success in close combat. Effective direct fires are essential to winning the close fight; they are the unique contribution of maneuver forces to the combine arms team. Because fire and movement are complementary components of maneuver, the tank or mechanized infantry company team commander must be able to effectively mass the fires of all available resources at critical points and times to be successful on the battlefield. |
|||
Unitwide |
Acquiring the enemy is a precursor to direct fire engagement. Commanders must not assume that the unit will be able to see the enemy; they must expect him to use cover and concealed routes effectively when attacking and to make best use of flanking and concealed positions in the defense. As a result, the company team will not often have the luxury of a fully exposed enemy that can be easily seen. Rather, the acquisition of the enemy will often be dependent on recognition of very subtle indicators that may be especially difficult to see while moving. Examples include exposed antennas, reflections from the vision blocks of enemy vehicles, small dust clouds, or smoke from vehicle engines or ATGM or tank fires. (NOTE: Refer to Figure 3-1 for more examples of these indicators.) Because of the difficulty of target acquisition, the company team commander must develop unit surveillance plans to assist the team in acquiring the enemy. He must also be prepared to apply these techniques to help orient other friendly forces. Techniques for unit surveillance, target acquisition, and orientation of subordinate elements are discussed in more detail in "Orient forces to speed target acquisition" later in this chapter. Target acquisition at the crew level and crew gunnery techniques are discussed in detail in FM 17-12-1 and FM 23-1. |
||
Principles of |
Effective fire control requires a unit to rapidly acquire the enemy and mass the effects of fires to achieve decisive results in the close fight. When planning and executing direct fires, the commander and subordinate leaders must know how to apply several fundamental principles. The purpose of these principles of direct fire is not to restrict the actions of subordinates. Applied correctly, they help the company team to accomplish its primary goal in any direct fire engagement: to both acquire first and shoot first; they give subordinates the freedom to act quickly upon acquisition of the enemy. This discussion focuses on the following principles:
|
||
| Mass the effects of fire |
The company team must mass its fires to achieve decisive results. Massing entails focusing fires at critical points and distributing the effects. Random application of fires is unlikely to have a decisive effect. For example, concentrating the company team’s fires at a single target may ensure its destruction or suppression; however, that fire control COA will probably not achieve a decisive effect on the enemy formation or position. |
||
| Destroy the greatest threat first |
The order in which the company team engages enemy forces is in direct relation to the danger they present. The threat posed by the enemy depends on his weapons, range, and positioning. Presented with multiple targets, a unit will, in almost all situations, initially concentrate fires to destroy the greatest threat, then distribute fires over the remainder of the enemy force. |
||
Avoid target overkill |
Use only the amount of fire required to achieve necessary effects. Target overkill wastes ammunition and ties up weapons that are better employed acquiring and engaging other targets. The idea of having every weapon engage a different target, however, must be tempered by the requirement to destroy the greatest threats first. |
||
| Employ the best weapon for the target |
Using the appropriate weapon for the target increases the probability of rapid enemy destruction or suppression; at the same time, it saves ammunition. The company team has many weapons with which to engage the enemy. Target type, range, and exposure are key factors in determining the weapon and ammunition that should be employed, as are weapons and ammunition availability and desired targets effects. Additionally, leaders should consider individual crew capabilities when deciding on the employment of weapons. The commander task organizes and arrays his forces based on the terrain, enemy, and desired effects of fires. As an example, when he expects an enemy dismounted assault in restricted terrain, the commander would employ his infantry squads, taking advantage of their ability to best engage numerous, fast-moving targets. |
||
| Minimize friendly exposure |
Units increase their survivability by exposing themselves to the enemy only to the extent necessary to engage him effectively. Natural or manmade defilade provides the best cover from kinetic-energy direct fire munitions. Crews and squads minimize their exposure by constantly seeking effective available cover, attempting to engage the enemy from the flank, remaining dispersed, firing from multiple positions, and limiting engagement times. |
||
Prevent fratricide |
The commander must be proactive in reducing the risk of fratricide and noncombatant casualties. He has numerous tools to assist him in this effort: identification training for combat vehicles and aircraft; the unit’s weapons safety posture; the weapons control status; recognition markings; situational awareness. Knowledge and employment of applicable ROE are the primary means of preventing noncombatant casualties. (NOTE: Because it is difficult to distinguish between friendly and enemy dismounted infantry soldiers, the commander must constantly monitor the position of friendly infantry squads.) |
||
| Plan for extreme limited visibility conditions |
At night, limited visibility fire control equipment enables the company team to engage enemy forces at nearly the same ranges that are applicable during the day. Obscurants such as dense fog, heavy smoke, and blowing sand, however, can reduce the capabilities of thermal and infrared (IR) equipment. The commander should therefore develop contingency plans for such extreme limited visibility conditions. Although decreased acquisition capabilities have minimal effect on area fire, point target engagements will likely occur at decreased ranges. Typically, firing positions, whether offensive or defensive, must be adjusted closer to the area or point where the commander intends to focus fires. Another alternative is the use of visual or IR illumination when there is insufficient ambient light for passive light intensification devices. (NOTE: Vehicles equipped with thermal sights can assist infantry squads in detecting and engaging enemy infantry forces in conditions such as heavy smoke and low illumination.) |
||
| Develop contingencies for diminished capabilities |
Leaders initially develop plans based on their units’ maximum capabilities; they make backup plans for implementation in the event of casualties or weapon damage or failure. While leaders cannot anticipate or plan for every situation, they should develop plans for what they view as the most probable occurrences. Building redundancy into these plans, such as having two systems observe the same sector, is an invaluable asset when the situation (and the number of available systems) permits. Designating alternate sectors of fire provides a means of shifting fires if adjacent elements are knocked out of action. |
||
Fire control measures |
Fire control measures are the means by which the commander or subordinate leaders control fires. Application of these concepts, procedures, and techniques assists the unit in acquiring the enemy, focusing fires on him, distributing the effects of the fires, and preventing fratricide. At the same time, no single measure is sufficient to effectively control fires. At the company team level, fire control measures will be effective only if the entire unit has a common understanding of what they mean and how to employ them. The following discussion focuses on the various fire control measures employed by the company team. Figure 2-16 lists the control measures; it is organized by whether they are terrain-based or threat-based.
Figure 2-16. Common fire control measures. |
||||||
| Terrain-based fire control measures |
The company team commander uses terrain-based fire control measures to focus and control fires on a particular point, line, or area rather than on a specific enemy element. The following paragraphs describe the TTP associated with this type of control measure. Target reference point. A TRP is a recognizable point on the ground that leaders use to orient friendly forces and to focus and control direct fires. In addition, when TRPs are designated as indirect fire targets, they can be used in calling for and adjusting indirect fires. Leaders designate TRPs at probable enemy locations and along likely avenues of approach. These points can be natural or man-made. A TRP can be an established site, such as a hill or a building, or an impromptu feature designated as a TRP on the spot, like a burning enemy vehicle or smoke generated by an artillery round. Friendly units can also construct markers to serve as TRPs, as illustrated in Figure 2-17. Ideally, TRPs should be visible in three observation modes (unaided, passive-IR, and thermal) so they can be seen by all forces. Example of TRPs include the following features and objects:
| ||
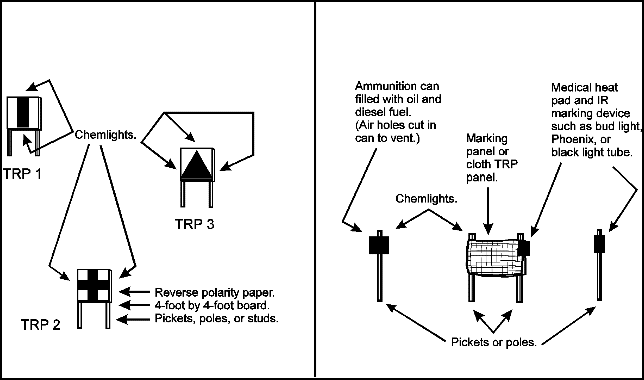 |
Figure 2-17. Examples of constructed TRP markers.
Engagement area. This fire control measure is an area along an enemy avenue of approach where the commander intends to mass the fires of available weapons to destroy an enemy force. The size and shape of the engagement area is determined by the degree of relatively unobstructed intervisibility available to the unit’s weapon systems in their firing positions and by the maximum range of those weapons. Typically, commanders delineate responsibility within the EA by assigning each platoon a sector of fire or direction of fire; these fire control measures are covered in the following paragraphs. Sector of fire. A sector of fire is a defined area that must be covered by direct fire. Leaders assign sectors of fire to subordinate elements, crew-served weapons, and individual soldiers to ensure coverage of an area of responsibility; they may also limit the sector of fire of an element or weapon to prevent accidental engagement of an adjacent unit. In assigning sectors of fire, commanders and subordinate leaders consider the number and types of weapons available. In addition, they must consider acquisition system type and field of view in determining the width of a sector of fire. For example, while unaided vision has a wide field of view, its ability to detect and identify targets at range and in limited visibility conditions is restricted. Conversely, most fire control acquisitions systems have greater detection and identification ranges than the unaided eye, but their field of view is narrow. Means of designating sectors of fire include the following:
Direction of fire. A direction of fire is an orientation or point used to assign responsibility for a particular area on the battlefield that must be covered by direct fire. Leaders designate directions of fire for the purpose of acquisition or engagement by subordinate elements, crew-served weapons, or individual soldiers. Direction of fire is most commonly employed when assigning sectors of fire would be difficult or impossible because of limited time or insufficient reference points. Means of designating a direction of fire include the following:
Quadrants. Quadrants are subdivisions of an area created by superimposing an imaginary pair of perpendicular axes over the terrain to create four separate areas or sectors. Quadrants can be based on the terrain, on friendly forces, or on the enemy formation. (NOTE: The technique in which quadrants are based on the enemy formation is usually referred to as the target array; it is covered in the discussion of threat-based fire control measures.) The method of quadrant numbering is established in the unit SOP; however, care must be taken to avoid confusion when quadrants based on terrain, friendly forces, and the enemy formation are used simultaneously. Terrain-based quadrant. A terrain-based quadrant entails use of a TRP, either existing or constructed, to designate the center point of the axes that divide the area into four quadrants. This technique can be employed in both offensive and defensive operations. In the offense, the commander designates the center of the quadrant using an existing feature or by creating a reference point (for example, using a ground burst illumination round, a smoke marking round, or a fire ignited by incendiary or tracer rounds). The axes delineating the quadrants run parallel and perpendicular to the direction of movement. In the defense, the commander designates the center of the quadrant using an existing or constructed TRP. In the examples shown in Figure 2-18, quadrants are marked using the letter "Q" and a number (Q1 to Q4); quadrant numbers are in the same relative positions as on military map sheets (from Q1 as the upper left-hand quadrant clockwise to Q4 as the lower left-hand quadrant). |
|||
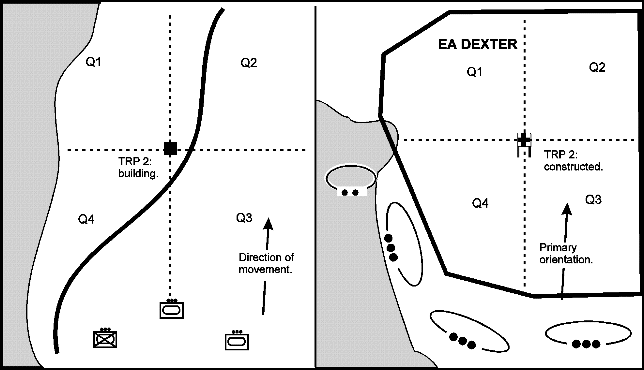 |
Figure 2-18. Examples of terrain-based quadrants.
Friendly-based quadrant. The friendly-based quadrant technique entails superimposing quadrants over the unit’s formation The center point is based on the center of the formation, and the axes run parallel and perpendicular to the general direction of travel. For rapid orientation, the friendly quadrant technique may be better than the clock direction method; this is because different elements of a large formation are rarely oriented in the same exact direction and because the relative dispersion of friendly forces causes parallax to the target. Figure 2-19 illustrates use of friendly-based quadrants. Maximum engagement line. An MEL is the linear depiction of the farthest limit of effective fire for a weapon or unit. This line is determined both by the weapon’s or unit’s maximum effective range and by the effects of terrain. For example, slope, vegetation, structures, and other features provide cover and concealment that may prevent the weapon from engaging out to the maximum effective range. An MEL serves several purposes. The commander may use it to prevent crews from engaging beyond the maximum effective range, to define criteria for the establishment of triggers, and to delineate the maximum extent of battle space on the sector sketch. Restrictive fire line. An RFL is a linear fire control measure beyond which engagement is prohibited without coordination. In the offense, the commander may designate an RFL to prevent a base of fire element from firing into the area where an assaulting element is maneuvering. This technique is particularly important when armored vehicles support the maneuver of infantry squads. In the defense, the commander may establish an RFL to prevent the unit from engaging a friendly rifle squad positioned in restricted terrain on the flank of an avenue of approach. |
|||
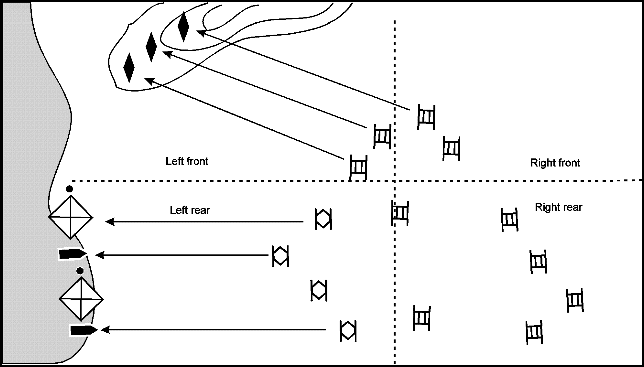 |
Figure 2-19. Example of friendly-based quadrants.
Final protective line. The FPL is a line of fire established where an enemy assault is to be checked by the interlocking fires of all available weapons. The unit reinforces this line with protective obstacles and with final protective fires (FPF) whenever possible. Initiation of the FPF is the signal for elements, crews, and individual soldiers to shift fires to their assigned portion of the FPL. They spare no ammunition in repelling the enemy assault, a particular concern for machine guns and other automatic weapons. |
|||
| Threat-based fire control measures |
The company team commander uses threat-based fire control measures to focus and control fires by directing the unit to engage a specific enemy element rather than to fire on a point or area. The following paragraphs describe the TTP associated with this type of control measure. Fire patterns. Fire patterns are a threat-based measure designed to distribute the fires of a unit simultaneously among multiple, similar targets. They are most often used by platoons to distribute fires across an enemy formation. Leaders designate and adjust fire patterns based on terrain and the anticipated enemy formation. The basic fire patterns, illustrated in Figure 2-20, are the following:
Frontal fire. Leaders may initiate frontal fire when targets are arrayed in front of the unit in a lateral configuration. Weapon systems engage targets to their respective fronts. For example, the left flank weapon engages the left-most target; the right flank weapon engages the right-most target. As targets are destroyed, weapons shift fires toward the center of the enemy formation and from near to far. Cross fire. Leaders initiate cross fire when targets are arrayed laterally across the unit’s front in a manner that permits diagonal fires at the enemy’s flank or when obstructions prevent unit weapons from firing frontally. Right flank weapons engage the left-most targets; left flank weapons engage the right-most targets. Firing diagonally across an engagement area provides more flank shots, thus increasing the chance of kills; it also reduces the possibility that friendly elements will be detected if the enemy continues to move forward. As enemy targets are destroyed, weapons shift fires toward the center of the enemy formation. Depth fire. Leaders initiate depth fire when targets are dispersed in depth, perpendicular to the unit. Center weapons engage the closest targets; flank weapons engage deeper targets. As the unit destroys targets, weapons shift fires toward the center of the enemy formation. |
||
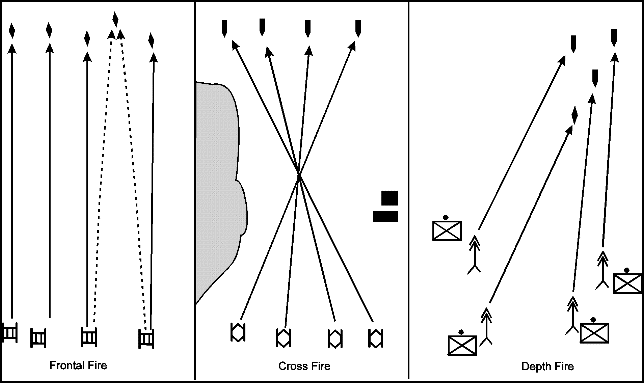 |
Figure 2-20. Examples of fire patterns.
Target array. Target array permits the commander to distribute fires when the enemy force is concentrated and terrain-based controls are inadequate. This threat-based distribution measure is created by superimposing a quadrant pattern over an enemy formation. The pattern is centered on the enemy formation, with the axes running parallel and perpendicular to the enemy’s direction of travel. Quadrants are described using their relative locations. The examples in Figure 2-21 illustrate the target array technique. |
|||
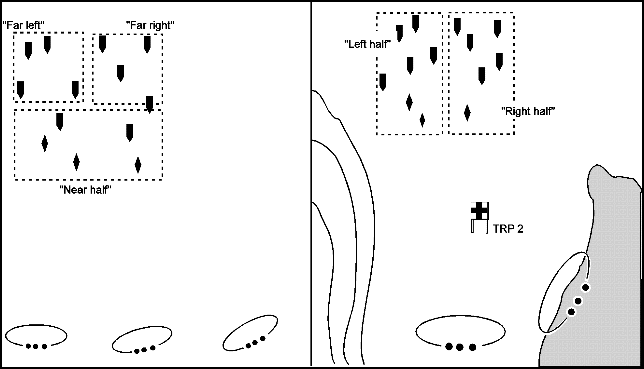 |
Figure 2-21. Examples of target array.
Engagement priorities. Engagement priorities, which entail the sequential ordering of targets to be engaged, can serve one or more of the following critical fire control functions:
Weapons ready posture. The weapons ready posture is a means by which leaders use their estimate of the situation to specify the ammunition and range for the most probable anticipated engagement. The ammunition selection is dependent on the target type, but the leader may adjust it based on engagement priorities, desired effects, and effective range. Range selection is dependent on the anticipated engagement range; it is affected by terrain intervisibility, weather, and light conditions. Within the company team, weapons ready posture affects the types and quantities of ammunition loaded in ready boxes, stowed in ready racks, and carried by rifle squads. The following considerations apply:
Trigger. A trigger is a specific set of conditions that dictates initiation of fires. Often referred to as engagement criteria, a trigger specifies the circumstances in which subordinate elements are to engage. The circumstances can be based on a friendly or enemy event. For example, the trigger for a friendly platoon to initiate engagement could be three or more enemy combat vehicles passing or crossing a given point or line. This line can be any natural or man-made linear feature, such as a road, ridge line, or stream. It may also be a line perpendicular to the unit’s orientation, delineated by one or more references points. Weapons control status. The three levels of weapons control status outline the conditions, based on target identification criteria, under which friendly elements may engage. The commander sets and adjusts the weapons control status based on friendly and enemy disposition and the clarity of the situation. In general, the higher the probability of fratricide, the more restrictive the weapons control status. The three levels, in descending order of restrictiveness, are the following:
As an example, the commander may establish the weapons control status as WEAPONS HOLD when friendly forces are conducting a passage of lines. By maintaining situational awareness of his own elements and adjacent friendly forces, however, he may be able to lower the weapons control status. In such a case, the commander may be able to set a WEAPONS FREE status when he knows there are no friendly elements in the vicinity of the engagement. This permits his elements to engage targets at extended ranges even though it is difficult to distinguish targets accurately at ranges beyond 2,000 meters under battlefield conditions. A further consideration is that the weapons control status is extremely important for forces using combat identification systems; establishing the weapons control status as WEAPONS FREE permits leaders to engage an unknown target when they fail to get a friendly response. Rules of engagement. ROE specify the circumstances and limitations under which forces may engage; they include definitions of combatant and noncombatant elements and prescribe the treatment of noncombatants. Factors influencing ROE are national command policy, the mission and commander’s intent, the operational environment, and the law of war. ROE always recognize a soldier’s right of self-defense; at the same time, they clearly define circumstances in which he may fire. Weapons safety posture. Weapons safety posture is an ammunition handling instruction that allows the commander to precisely control the safety of his unit’s weapons. Leaders’ supervision of the weapons safety posture, as well as soldiers’ adherence to it, minimizes the risk of accidental discharge and fratricide. Table 2-4 outlines procedures and considerations for the company team in using the four weapons safety postures, listed in ascending order of restrictiveness:
In setting and adjusting the weapons safety posture, the commander must weigh the desire to prevent accidental discharges against the requirement for immediate action based on the enemy threat. If the threat of direct contact is high, for example, the commander may establish the weapons safety posture as AMMUNITION LOADED. If the requirement for action is less immediate, he may lower the posture to AMMUNITION LOCKED or AMMUNITION PREPARED. Additionally, the commander may designate different weapons safety postures for different elements of the unit. For example, in the attack position, tanks and BFVs may switch to AMMUNITION LOADED while rifle squads riding in BFVs remain at AMMUNITION LOCKED. |
|||
Table 2-4. Weapons safety posture levels.
|
ELEMENT SAFETY |
TANK WEAPONS AND AMMUNITION |
BFV WEAPONS AND AMMUNITION |
INFANTRY SQUAD WEAPONS AND AMMUNITION |
|
AMMUNITION LOADED |
Main gun ammunition loaded. Machine gun ammunition on feed tray; bolt locked to rear. Smoke grenades in launchers. Weapons on electrical safe. |
25-mm rounds cycled to bolt. Coax rounds on feed tray; bolt locked to rear. TOW missiles in launchers. Smoke grenades in launchers. Weapons on electrical safe. |
Rifle rounds chambered. Machine gun and SAW ammunition on feed tray; bolt locked to rear. Grenade launcher loaded. Weapons on manual safe. |
|
AMMUNITION LOCKED |
Main gun ammunition in ready rack. Machine gun ammunition on feed tray; bolt locked forward. Smoke grenades in launchers. Weapons on electrical safe. |
25-mm rounds loaded into feeder, but not cycled to bolt TOW missiles in launchers. Smoke grenades in launchers. Weapons on electrical safe. |
Magazines locked into rifles. Machine gun and SAW ammunition on feed tray; bolt locked forward Grenade launcher unloaded. |
|
AMMUNITION PREPARED |
Main gun ready rack filled. Machine gun ammunition boxes filled. Smoke grenades in launchers. |
25-mm ready boxes filled. Coax ammunition boxes filled. TOW missiles in launchers. Smoke grenades in launchers. |
Magazines, ammunition boxes, launcher grenades, and hand grenades prepared but stowed in pouches/vests. |
|
WEAPONS CLEARED |
Main gun ready rack filled. Machine gun cleared, with bolts locked to the rear. |
25-mm feeder removed; feeder and chamber cleared. Coax bolt group removed and chamber cleared. |
Magazine, ammunition boxes, and launcher grenades removed; weapons cleared. |
Engagement techniques. Engagement techniques are effects-oriented fire distribution measures. The following engagement techniques, the most common in company team operations, are covered in this discussion:
Point fire. Point fire entails concentrating the effects of a unit’s fire against a specific, identified target such as a vehicle, machine gun bunker, or ATGM position. When leaders direct point fire, all of the unit’s weapons engage the target, firing until it is destroyed or the required time of suppression has expired. Employing converging fires from dispersed positions makes point fire more effective because the target is engaged from multiple directions. The unit may initiate an engagement using point fire against the most dangerous threat, then revert to area fire against other, less threatening point targets. (NOTE: Use of point fire is fairly rare because a unit seldom encounters a single, clearly identified enemy weapon.) Area fire. Area fire involves distributing the effects of a unit’s fire over an area in which enemy positions are numerous or are not obvious. If the area is large, leaders assign sectors of fire to subordinate elements using a terrain-based distribution method such as the quadrant technique. Typically, the primary purpose of the area fire is suppression; however, sustaining effective suppression requires judicious control of the rate of fire. Volley fire. Units employ volley fire, also referred to as simultaneous fire, to rapidly mass the effects of their fires or to gain fire superiority. For example, a unit may initiate a support by fire operation with volley fire, then revert to alternating or sequential fire to maintain suppression. Volley fire is also employed to negate the low probability of hit and kill of certain antiarmor weapons. As an example, a rifle squad may employ volley fire with its AT4s to ensure rapid destruction of a BMP that is engaging a friendly position. Alternating fire. In alternating fire, pairs of elements continuously engage the same point or area target one at a time. For example, a company team may alternate fires of two platoons; a tank platoon may alternate the fires of its sections; or an infantry platoon may alternate the fires of a pair of machine guns. Alternating fire permits the unit to maintain suppression for a longer duration than does volley fire; it also forces the enemy to acquire and engage alternating points of fire. Observed fire. Observed fire is normally used when the company team is in protected defensive positions with engagement ranges in excess of 2,500 meters. It can be employed between elements of the company team, such as the tank platoon lasing and observing while the BFV platoon fires, or between sections of a platoon. The commander or platoon leader directs one element or section to engage. The remaining elements or section observes fires and prepares to engage on order in case the engaging element consistently misses its targets, experiences a malfunction, or runs low on ammunition. Observed fire allows for mutual observation and assistance while protecting the location of the observing elements. Sequential fire. Sequential fire entails the subordinate elements of a unit engaging the same point or area target one after another in an arranged sequence. For example, a mechanized infantry platoon may sequence the fires of its four BFVs to gain maximum time of suppression. Sequential fire can also help to prevent the waste of ammunition, as when an infantry rifle platoon waits to see the effects of the first Javelin before firing another. Additionally, sequential fire permits elements that have already fired to pass on information they have learned from the engagement. An example would be an infantryman who missed a BMP with AT4 fires passing range and lead information to the next soldier preparing to engage the BMP with an AT4. Time of suppression. Time of suppression is the period, specified by the commander, during which an enemy position or force is required to be suppressed. Suppression time is typically dependent on the time it will take a supported element to maneuver. Normally, a unit suppresses an enemy position using the sustained rate of fire of its automatic weapons. In planning for sustained suppression, leaders must consider several factors: the estimated time of suppression, the size of the area being suppressed, the type of enemy force to be suppressed, range to the target, rates of fire, and available ammunition quantities. The following example lists steps that a unit might take in calculating time of suppression capabilities:
Reconnaissance by fire. Reconnaissance by fire is the process of engaging possible enemy locations to elicit a tactical response, such as return fire or movement. This response permits the commander and subordinate leaders to make accurate target acquisition and then to mass fires against the enemy element. Typically, the commander directs a subordinate element to conduct the reconnaissance by fire. For example, he may direct an overwatching platoon to conduct the reconnaissance by fire against a probable enemy position before initiating movement by a bounding element. |
|||
Fire commands |
Fire commands are oral orders issued by commanders and leaders to focus and distribute fires as required to achieve decisive effects against the enemy. They allow leaders to rapidly and concisely articulate their firing instructions using a standard format. Unit fire commands include these elements, which are discussed in detail in the following paragraphs:
|
||
Alert |
The alert specifies the elements that are directed to fire. It does not require the leader initiating the command to identify himself. Examples of the alert element (call signs and code words based on unit SOP) include the following:
|
||
| Weapon or ammunition (optional) |
This element identifies the weapon and/or ammunition to be employed by the alerted elements. Leaders may designate the type and number of rounds to limit expenditure of ammunition. Examples of this element include the following:
|
||
Target description |
Target description designates which enemy elements are to be engaged. Leaders may use the description to focus fires or achieve distribution. Examples of target description include the following:
|
||
Orientation |
This element identifies the location of the target. There are numerous ways to designate the location of target, including the following:
|
||
Range (optional) |
The range element identifies the distance to the target. Announcing range is not necessary for systems that are range finder-equipped or that employ command-guided or self-guided munitions. For systems that require manual range settings, leaders have a variety of means for determining range, including the following:
|
||
Control (optional) |
The commander may use this optional element to direct desired target effects, distribution methods, or engagement techniques. Subordinate leaders may include the control element to supplement the commander’s instructions and achieve effective distribution. Examples of information specified in the control element include the following:
|
||
Execution |
The execution element specifies when fires will be initiated. The commander may wish to engage immediately, delay initiation, or delegate authority to engage. Examples of this element include the following:
|
||
Fire control process |
To successfully bring direct fires against an enemy force, commanders and leaders must continuously apply the steps of the fire control process. At the heart of this process are two critical actions: rapid, accurate target acquisition and the massing of fire to achieve decisive effects on the target. Target acquisition is the detection, identification, and location of a target in sufficient detail to permit the effective employment of weapons. Massing entails focusing fires at critical points and then distributing the fires for optimum effect. The following discussion examines target acquisition and massing of fires using these basic steps of the fire control process:
|
||
| Identify probable enemy locations and determine the enemy scheme of maneuver |
The commander and subordinate leaders plan and execute direct fires based on their estimate of the situation. An essential part of this estimate is the analysis of the terrain and the enemy force, which aids the commander in visualizing how the enemy will attack or defend a particular piece of terrain. A defending enemy’s defensive positions or an attacking enemy’s support positions are normally driven by intervisibility. Typically, there are limited points on a piece of terrain that provide both good fields of fire and adequate cover for a defender. Similarly, an attacking enemy will have only a limited selection of avenues of approach that provide adequate cover and concealment. Coupled with available intelligence, an understanding of the effects of a specific piece of terrain on maneuver will assist the commander in identifying probable enemy locations and likely avenues of approach both before and during the fight. Figure 2-22 illustrates the commander’s analysis of enemy locations and scheme of maneuver; he may use any or all of the following products or techniques in developing and updating the analysis:
|
||
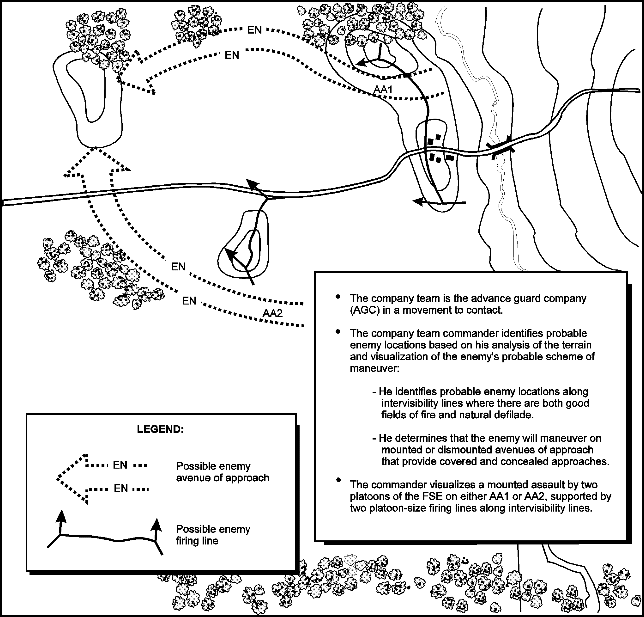 |
Figure 2-22. Example of identifying probable enemy locations
and determining enemy scheme of maneuver.
| Determine where and how to mass fires |
To achieve decisive effects, friendly forces must mass their fires. Effective massing requires the commander both to focus the fires of subordinate elements and to distribute the effects of the fires. Based on his estimate of the situation and his concept of the operation, the commander identifies points where he wants to, or must, focus the unit’s fires. Most often, these are locations he has identified as probable enemy positions or points along likely avenues of approach where the unit can mass fires. Because subordinate elements may not initially be oriented on the point where the commander wants to mass fires, he may issue a fire command to focus the fires. At the same time, the commander must use direct fire control measures to effectively distribute the fires of his elements, which are now focused on the same point. Figure 2-23 illustrates how the commander masses fires against the enemy. |
||
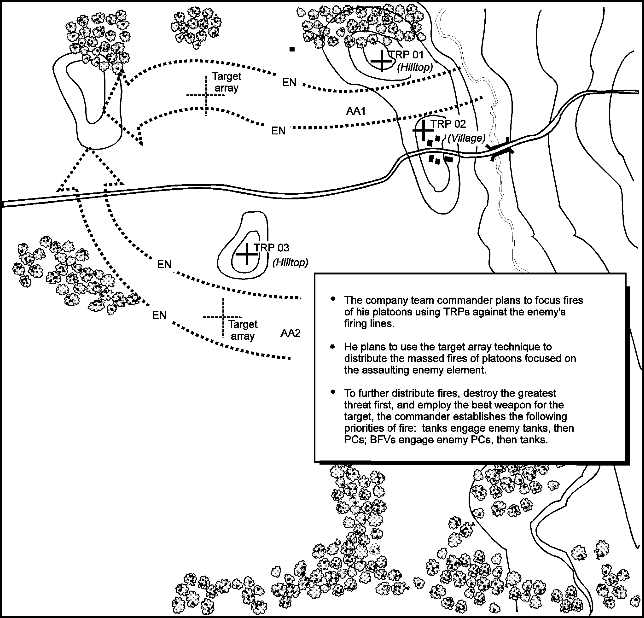 |
Figure 2-23. Example of determining where and how to mass (focus and distribute)
fire effects to kill the enemy.
| Orient forces to speed target acquisition |
To effectively engage the enemy with direct fires, friendly forces must rapidly and accurately acquire enemy elements. Orienting friendly forces on probable enemy locations and on likely avenues of approach will speed target acquisition. Conversely, failure to orient subordinate elements will result in slower acquisition; this greatly increases the likelihood that enemy forces will be able to engage first. The clock direction orientation method, which is prescribed in most unit SOPs, is good for achieving all-around security; however, it does not ensure that friendly forces are most effectively oriented to detect the enemy. To achieve this critical orientation, the commander typically designates TRPs on or near probable enemy locations and avenues of approach; he orients his subordinate elements using directions of fire or sectors of fire. Normally, the gunners on crew-served weapons scan the designated direction, sector, or area while other crewmen observe alternate sectors or areas to provide all-around security. Figure 2-24 illustrates how the commander orients the company team for quick, effective acquisition of the enemy force. |
||
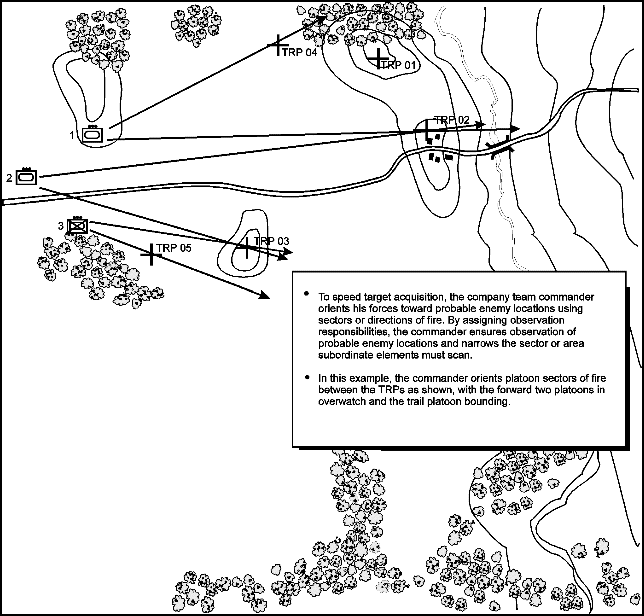 |
Figure 2-24. Example of orienting forces to speed target acquisition.
| Shift fires to refocus and redistribute |
As the engagement proceeds, leaders must shift fires to refocus and redistribute the effects based on their evolving estimate of the situation. See Figure 2-25 for an illustration of this process. Situational awareness becomes an essential part of the fire control process at this point. The commander and subordinate leaders apply the same techniques and considerations, including fire control measures, that they used earlier to focus and distribute fires. A variety of situations will dictate shifting of fires, including the following:
|
||
Direct fire planning |
The commander plans direct fires in conjunction with development of his estimate of the situation and completion of the plan. Determining where and how the company team can and will mass fires is also an essential step as the commander develops his concept of the operation. After identifying probable enemy locations, the commander determines points or areas where he will focus combat power. His visualization of where and how the enemy will attack or defend will assist him in determining the volume of fires he must focus at particular points to have a decisive effect. In addition, if he intends to mass the fires of more than one subordinate element, the commander must establish the means for distributing fires effectively. Based on where and how they want to focus and distribute fires, the commander and subordinate leaders can then establish the weapons ready postures for company team elements as well as triggers for initiating fires. Additionally, the commander must evaluate the risk of fratricide and establish controls to prevent it; these measures include designation of recognition markings, weapons control status, and weapons safety posture. Having determined where and how they will mass and distribute fires, the commander and subordinate leaders then must orient elements so they can rapidly and accurately acquire the enemy. They also can war-game the selected COA or concept of the operation to determine probable requirements for refocusing and redistributing fires and to establish other required controls. Also during mission preparation, the commander plans and conducts rehearsals of direct fires (and of the fire control process) based on his estimate of the situation. The commander and his subordinate leaders must continue to apply planning procedures and considerations throughout execution. They must be able to adjust direct fires based on a continuously updated estimate of the situation, combining situational awareness with the latest available intelligence. When necessary, they must also apply effective direct fire SOPs, which are covered in the following discussion. |
||
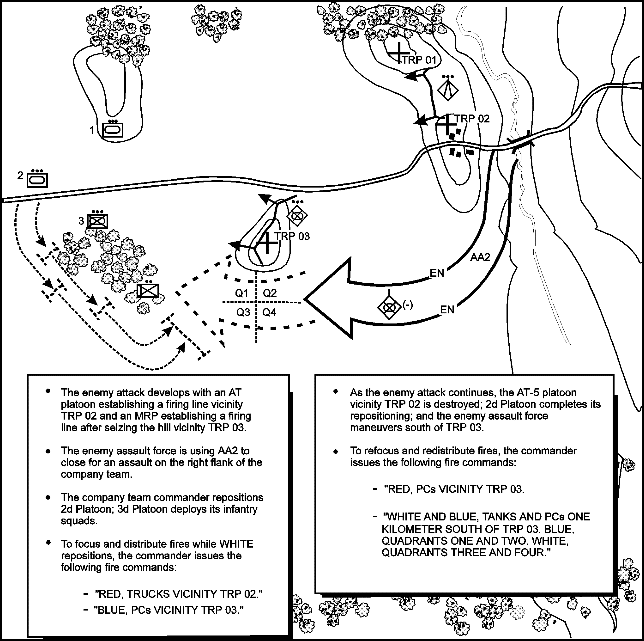 |
Figure 2-25. Example of shifting to refocus and redistribute fires.
Direct fire SOP |
A well-rehearsed direct fire SOP ensures quick, predictable actions by all members of the company team. The commander bases the various elements of the SOP on the capabilities of his force and on anticipated conditions and situations. SOP elements should include standing means for focusing fires, distributing their effects, orienting forces, and preventing fratricide; these elements are examined later in this discussion. The commander should adjust the direct fire SOP whenever changes to anticipated and actual METT-TC factors become apparent. If the commander does not issue any other instructions, the company team begins the engagement using the SOP. The commander can subsequently use a fire command to refocus or redistribute fires. The following paragraphs discuss specific SOP provisions for focusing fires, distributing fires, orienting forces, and preventing fratricide. |
||
| SOP element for focusing fires |
TRPs are a common means of focusing fires. One technique is to establish a standard respective position for TRPs in relation to friendly elements and then to consistently number the TRPs, such as from left to right. This allows leaders to quickly determine and communicate the location of the TRPs. |
||
| SOP element for distributing fires |
Two useful means of distributing the company team’s fires are engagement priorities and target array. One technique is to assign an engagement priority, by type of enemy vehicle or weapon, for each type of friendly weapon system. The target array technique can assist in distribution by assigning specific friendly elements to engage enemy elements of approximately similar capabilities. The following are example SOP elements for distributing the fires of a mechanized infantry company team (one tank platoon, two mechanized infantry platoons) moving in a wedge or line formation with the tank platoon in the center:
|
||
| SOP element for orienting forces |
A standard means of orienting friendly forces is to assign a primary direction of fire, using a TRP, to orient each element on a probable enemy position or likely avenue of approach. To provide all-around security, the SOP can supplement the primary direction of fire with sectors using a friendly-based quadrant. The following example SOP elements illustrate the use of these techniques:
|
||
| SOP element for preventing fratricide |
A primary means of minimizing fratricide risk is to establish a standing weapons control status of WEAPONS TIGHT, which requires positive enemy identification prior to engagement. The SOP must also cover means for identifying friendly rifle squads and other dismounted elements; techniques include using arm bands, medical heat pads, or an IR light source or detonating a smoke grenade of a designated color at the appropriate time. At the bottom line, the SOP must address the most critical requirement of fratricide prevention: maintaining situational awareness. It must direct subordinate leaders to inform the commander, adjacent elements, and subordinates whenever a friendly force is moving or preparing to move. |
||